Mazda 2: Manual Type
Mazda2 Owners Manual
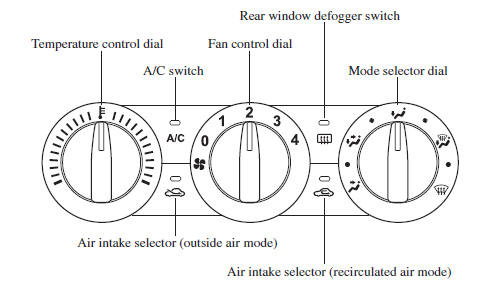
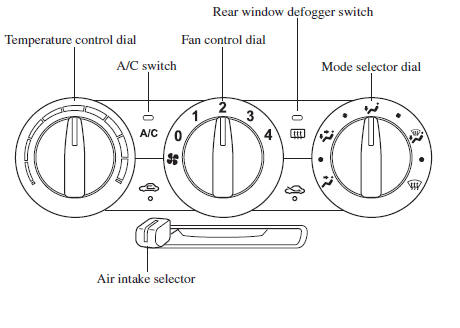
Type A
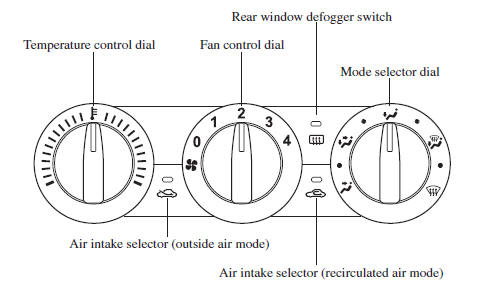
Type B
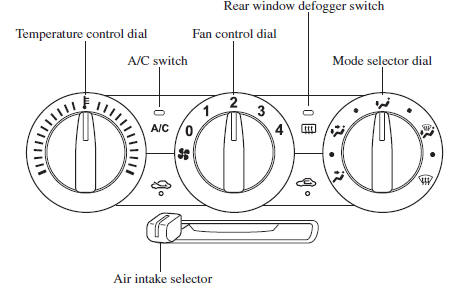
Type C
Type D
Control Switches
Temperature control dial
(Type A/Type B/Type C) This dial controls temperature. Turn it clockwise for hot and anticlockwise for cold.
(Type D) This dial controls the air temperature when using the air conditioner. Turn it clockwise for cold.
Fan control dial
This dial allows variable fan speeds.
0—Fan off
1—Low speed
2—Medium low speed
3—Medium high speed
4—High speed
Mode selector dial
Turn the mode selector dial to select airfl ow mode (page 5-4 ).
NOTE
- The mode selector dial can be set at
the intermediate positions (

) between each mode. Set the dial to an intermediate position if you want to split the airfl ow between the two modes. - For example, when the mode selector
dial is at the
 position between
the and
and
 positions, airfl ow from
the fl oor vent is less than that of the
position.
A/C switch (Type A/Type C/Type D)
Press the A/C switch to turn the air conditioner on. The indicator light on the switch will illuminate when the fan control dial is set at position 1, 2, 3, or 4.
Press the switch once again to turn the air conditioner off.
NOTE
The air conditioner may not function when the outside temperature approaches 0 °C (32 °F).
Air intake selector (Type A/Type B)
This switch controls the source of air entering the vehicle.
Press the air intake selector switch to alternate between the outside air and recirculated air modes.
Recirculated air mode 
Outside air is shut off. Air within the vehicle is recirculated.
Outside air mode 
Outside air is allowed to enter the cabin. Use this mode for ventilation or windscreen defrosting.
WARNING
Do not use the recirculated air mode in cold or rainy weather: Using the recirculated air mode in cold or rainy weather is dangerous as it will cause the windows to fog up. Your vision will be hampered, which could lead to a serious accident.
Air intake selector (Type C/Type D)
This lever controls the source of air entering the vehicle.
It is recommended that under normal conditions the switch be kept in the outside air position.
Recirculated air position 
Outside air is shut off. Air within the vehicle is recirculated.
Outside air position 
(Type C) Outside air is taken into the vehicle. Use this position for normal ventilation and heating.
(Type D) Outside air is taken into the vehicle. Use this position for normal ventilation.
WARNING
Do not use the  position
in cold or
rainy weather:
Using the  position in cold or rainy
weather is dangerous as it will cause
the windows to fog up. Your vision will
be hampered, which could lead to a
serious accident.
Heating
- Set the mode selector dial to the

position. - (Type A/Type B)
Set the air intake selector to the outside air mode.
(Type C)
Set the air intake selector to the 
position.
- Set the temperature control dial to the hot position.
- Set the fan control dial to the desired speed.
- (Type A/Type C) If dehumidifi ed heating is desired, turn on the air conditioner.
NOTE
- If the windscreen fogs up easily, set
the mode selector dial to the

position. - (Type A/Type C)
If cooler air is desired at face level,
set the mode selector dial to the

position and adjust the temperature control dial to maintain maximum comfort. - The air to the fl oor is warmer than air to the face (except when the temperature control dial is set at the extreme hot or cold position).
- (Type A/Type B)
In the
 position, the outside
air mode is automatically selected. The air intake selector cannot be changed to the recirculated air mode.
Cooling (With air conditioner)
- Set the mode selector dial to the

position. - Set the temperature control dial to the cold position
- Set the fan control dial to the desired speed.
- Turn on the air conditioner by pressing the A/C switch.
- After cooling begins, adjust the fan control dial and temperature control dial as needed to maintain maximum comfort.
CAUTION
If the air conditioner is used while driving up long hills or in heavy traffi c, monitor the engine coolant temperature warning light to see if it is illuminated or fl ashing (page 4-37 ).
The air conditioner may cause engine overheating. If the warning light is illuminated or fl ashing, turn the air conditioning off (page 7-26 ).
NOTE
- When maximum cooling is desired, set the temperature control dial to the extreme cold position and set the air intake selector to the recirculated air mode, then set the fan control dial to position 4.
- (Type A/Type C) If warmer air is desired at fl oor level, set the mode selector dial to the position and adjust the temperature control dial to maintain maximum comfort.
- The air to the fl oor is warmer than air to the face (except when the temperature control dial is set at the extreme hot or cold position).
Ventilation
- Set the mode selector dial to the

position. - (Type A/Type B)
Set the air intake selector to the outside
air mode.
(Type C/Type D) Set the air intake selector to the

position. - Set the temperature control dial to the desired position.
- Set the fan control dial to the desired speed.
Windscreen Defrosting and Defogging
- Set the mode selector dial to the

position. - (Type C/Type D)
Set the air intake selector to the

position. - Set the temperature control dial to the desired position.
- Set the fan control dial to the desired speed.
- (Type A/Type C)
If dehumidifi ed heating is desired, turn
on the air conditioner.
(Type D) Press the A/C switch to turn on the air conditioner.
WARNING
Do not defog the windscreen using the
position with the temperature
control set to the cold position (Type A/
Type B/Type C):
Using the
position with the
temperature control set to the cold
position is dangerous as it will cause
the outside of the windscreen to fog up.
Your vision will be hampered, which
could lead to a serious accident. Set the
temperature control to the hot or warm
position when using the
position.
Do not leave the air conditioner in the
position with the temperature
control set to cold after the windscreen
has defogged (Type D):
Leaving the air conditioner in the
position with the temperature control
set to cold after the windscreen has
defogged is dangerous as the outside of
the windscreen will fog up. Your vision
will be hampered, which could lead to a
serious accident.
Set the mode selector dial except the
position and turn on the windscreen
wipers to clear the window.
NOTE
- (Type A/Type C) For maximum defrosting, turn on the air conditioner, set the temperature control dial to the extreme hot position, and the fan control dial to position 4.
- (Type A/Type C)
If warm air is desired at the fl oor, set
the mode selector dial to the

position. - (Type A/Type B)
In the
 position, the outside
air mode is automatically selected. The air intake selector cannot be changed to the recirculated air mode.
Dehumidifying (With air conditioner)
Operate the air conditioner in cool or cold weather to help defog the windscreen and side windows.
- Set the mode selector dial to the desired position.
- (Type A)
Set the air intake selector to the outside
air mode.
(Type C/Type D) Set the air intake selector to the position.
- Set the temperature control dial to the

desired position. - Set the fan control dial to the desired speed.
- Turn on the air conditioner by pressing the A/C switch.
NOTE
(Type A/Type C) One of the functions of the air conditioner is dehumidifying the air and, to use this function, the temperature does not have to be set to cold.
Therefore, set the temperature control dial to the desired position (hot or cold) and turn on the air conditioner when you want to dehumidify the cabin air.


Other info:
Honda Fit. Towing a Trailer
Your vehicle is not designed to tow a trailer. Attempting to do so can void
your
warranties.
Towing Your Vehicle
Your vehicle can be towed behind a motorhome.
■When Your Vehicle is Towed B ...
Renault Clio. Stop and Start Function
This system enables a reduced fuel
consumption and lower greenhouse
gas emissions. The system is activated
automatically when the vehicle is
started. While driving, the system stops
the engine (s ...
Peugeot 208. Folding the backrest
Move the front seats forward if necessary.
Position the seat belts on the backrest and buckle them.
Place the head restraints in the low position.
Press both controls 1 simultaneously ...
Manuals For Car Models
-
 Chevrolet Sonic
 -
 Citroen C3
 -
 Fiat Punto
 -
 Honda Fit
 -
 Mazda 2
 -
 Nissan Micra
 -
 Peugeot 208
 -
 Renault Clio
 -
 Seat Ibiza
 -
 Skoda Fabia
 - Honda Pilot
- Volkswagen ID4
- Toyota Prius