
Mazda 2: Rear View Monitor
Mazda2 Owners Manual
The rear view monitor provides visual images of the rear of the vehicle when reversing.
WARNING
Always drive carefully confi rming the safety of the rear and the surrounding conditions by looking directly with your eyes: Reversing the vehicle by only looking at the screen is dangerous as it may cause an accident or a collision with an object. The rear view monitor is only a visual assist device when reversing the vehicle. The images on the screen may be different from the actual conditions.
CAUTION
Do not use the rear view monitor under the following conditions: Using the rear view monitor under the following conditions is dangerous and could result in injury or vehicle damage or both.
- Icy or snow-covered roads.
- Tyre chains or a temporary spare tyre is installed.
- The boot lid/liftgate is not fully closed.
- The vehicle is on a road incline.
When the display is cold, images may course across the monitor or the screen and may be dimmer than usual, which could cause diffi culty in confi rming the surrounding conditions of the vehicle. Always drive carefully confi rming the safety of the rear and the surrounding conditions by looking directly with your eyes.
Do not apply excessive force to the camera. The camera position and angle may deviate.
Do not disassemble, modify, or remove it as it may no longer be waterproof.
The camera cover is made of plastic. Do not apply degreasing agents, organic solvents, wax, or glass coating agents to the camera cover. If any are spilled on the cover, wipe off with a soft cloth immediately.
Do not rub the cover excessively, or polish it using an abrasive compound or a hard brush. The cover may be damaged affecting the image.
NOTE
- If water, snow, or mud is stuck on the camera lens, wipe it off using a soft cloth. If it cannot be wiped off, use a mild detergent.
- If the camera temperature changes rapidly (Hot to cold, cold to hot), the rear view monitor may not operate correctly.
- When replacing the tyres, consult an expert repairer, we recommend an Authorised Mazda Repairer. Replacing the tyres could result in deviation of the guide lines which appear on the display.
- If the vehicle's front, side, or rear has been involved in a collision, the alignment of the rear view parking camera (location, installation angle) may have deviated. Always consult an expert repairer, we recommend an Authorised Mazda Repairer to have the vehicle inspected.
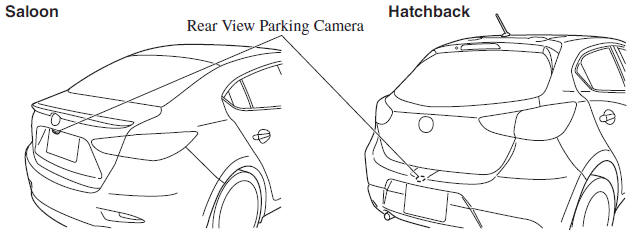
Rear View Parking Camera Location
Switching to the Rear View Monitor Display
Shift the shift lever to R with the ignition switched ON to switch the display to the rear view monitor display.
NOTE
When the shift lever is shifted from R to another shift lever position, the screen returns to the previous display.
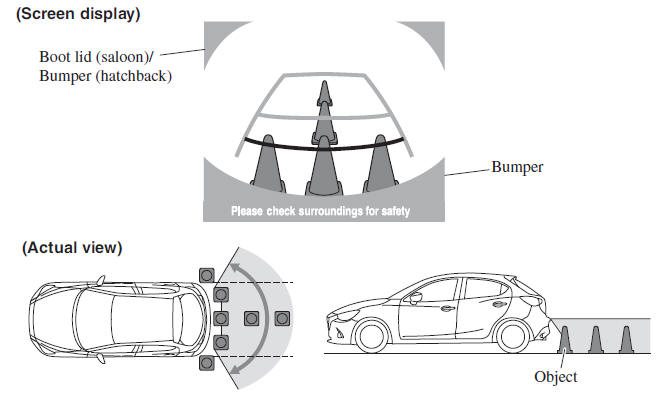
Displayable Range on the Screen
The images on the screen may be different from the actual conditions.
NOTE
The displayable range varies depending on the vehicle and road conditions.
The displayable range is limited. Objects under the bumper or around the bumper ends cannot be displayed.
The distance appearing in the displayed image is different from the actual distance because the rear view parking camera is equipped with a specifi c lens.
Some optionally installed vehicle accessories may be picked up by the camera. Do not install any optional parts that can interfere with the camera view, such as illuminating parts or parts made of refl ective material.
It may be diffi cult to see the display under the following conditions, however, it does not indicate a malfunction.
- In darkened areas.
- When the temperature around the lens is high/low.
- When the camera is wet such as on a rainy day or during periods of high humidity.
- When foreign material such as mud is stuck around the camera.
- When the camera lens refl ects sunlight or headlight beams.
Image display may be delayed if the temperature around the camera is low.
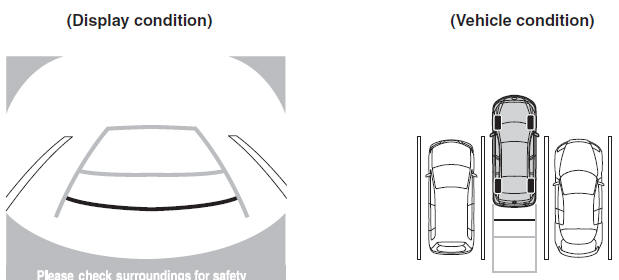
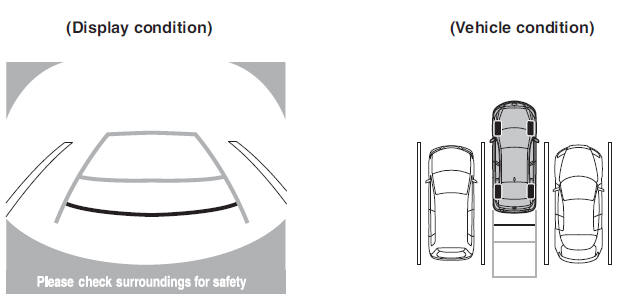
Viewing the Display
Guide lines which indicate the width of the vehicle (yellow) are displayed on the screen as a reference to the approximate width of the vehicle in comparison to the width of the parking space you are about to back into.
Use this display view for parking your vehicle in a parking space or garage.
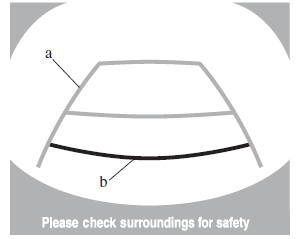
- Vehicle width guide lines (yellow) These guide lines serve as a reference to the approximate width of the vehicle.
- Distance guide lines.
These guide lines indicate the approximate distance to a point measured from the vehicle's rear (from the end of the bumper).
The red and yellow lines indicate the points about 50 cm (19 in) for the red line and 100 cm (39.3 in) for the yellow lines from the rear bumper (at the centre point of each of the lines).
CAUTION
The guide lines on the screen are fi xed lines. They are not synced to the driver's turning of the steering wheel. Always be careful and check the area to the vehicle's rear and the surrounding area directly with your eyes while backing up.
Rear View Monitor Operation
The operation of the rear view monitor when reversing the vehicle varies depending on the traffi c, road, and vehicle conditions. The amount of steering and the timing also varies depending on conditions, so confi rm the surrounding conditions directly with your eyes and steer the vehicle in accordance with the conditions.
Be well aware of the above cautions prior to using the rear view monitor.
NOTE
Images displayed on the monitor from the rear view parking camera are reversed images (mirror images).
- Shift the shift lever to R to switch the display to the rear view monitor display.
- Confi rming the surrounding conditions, reverse the vehicle.
- After your vehicle begins entering the parking space, continue backing up slowly so that the distance between the vehicle width lines and the sides of the parking space on the left and right are roughly equal.
- Continue to adjust the steering wheel until the vehicle width guide lines are parallel to the left and right sides of the parking space.
- Once they are parallel, straighten the wheels and back your vehicle slowly into the parking space. Continue checking the vehicle's surroundings and then stop the vehicle in the best possible position. (If the parking space has division lines, check whether the vehicle width guide lines are parallel to them.)
- When the shift lever is shifted from R to another shift lever position, the screen returns to the previous display.
NOTE
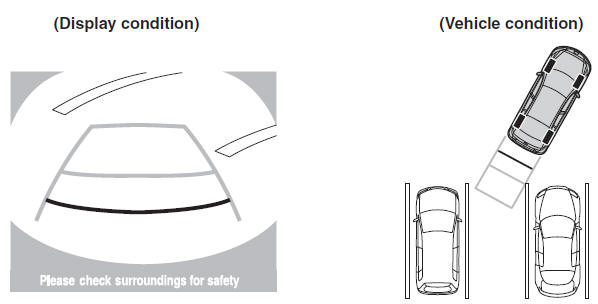
Because there may be a difference between the displayed image, such as indicated below, and the actual conditions when parking, always verify the safety at the rear of the vehicle and the surrounding area directly with your eyes.
- In the image of the parking space (or garage) displayed below, even though the back end and distance guide lines appear parallel in the monitor, they may not actually be parallel on the ground.
- When parking in a space with a division line on only one side of the parking space, the division line and the vehicle width guide line may appear parallel on the monitor, but they may not actually be parallel on the ground.
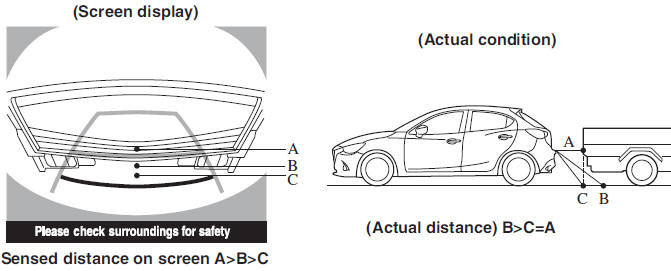
Variance Between Actual Road Conditions and Displayed Image
Some variance occurs between the actual road and the displayed road. Such variance in distance perspective could lead to an accident. Note the following conditions that may cause a variance in distance perspective.
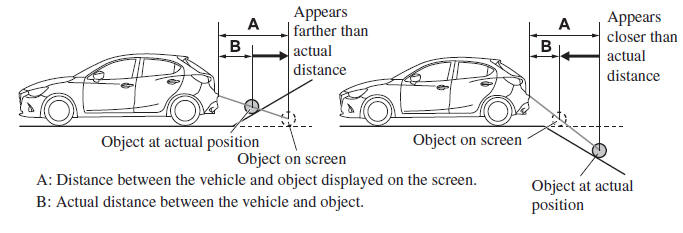
When the vehicle is tilted due to the weight of passengers and load
When the vehicle rear is lowered, the object displayed on the screen appears farther than the actual distance.
When there is a steep grade behind the vehicle
When there is a steep upgrade (downgrade) behind the vehicle, the object displayed on the screen appears farther (downgrade: closer) than the actual distance.
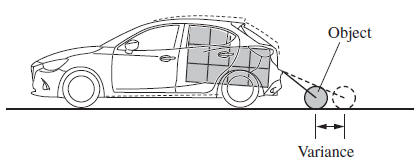
Three-dimensional object on vehicle rear
Because the distance guide lines are displayed based on a fl at surface, the distance to the three-dimensional object displayed on the screen is different from the actual distance.
Picture Quality Adjustment
WARNING
Always adjust the picture quality of the rear view monitor while the vehicle is stopped: Do not adjust the picture quality of the rear view monitor while driving the vehicle.
Adjusting the picture quality of the rear view monitor such as brightness, contrast, colour, and tint while driving the vehicle is dangerous as it could distract your attention from the vehicle operation which could lead to an accident.
Picture quality adjustment can be done while the shift lever is in reverse (R).
There are four settings which can be adjusted including, brightness, contrast, tint, and colour. When adjusting, pay suffi cient attention to the vehicle surroundings.
- Select
 the icon on the
screen to display the tabs. - Select the desired tab item.
- Adjust the brightness, contrast, tint, and colour using the slider.
If you need to reset, press the reset button.
- Select the
 icon on the
screen to close the tab.


Other info:
Nissan Micra. Instrument brightness control
The instrument brightness control operates when
the headlight control switch is in the
or position.
Push the control A to adjust the brightness of
instrument panel lights when driving at n ...
Honda Fit. Safety of Infants and Small Children
Protecting Infants
An infant must be properly restrained in a rear-facing, reclining child seat
until the
infant reaches the seat maker’s weight or height limit for the seat, and the
infant is ...
Chevrolet Sonic. Trip Computer
The trip computer is located in the Driver Information Center (DIC).
It provides the driver with driving information such as average speed, fuel range,
average fuel economy, and a timer.
1. SET/ ...
Manuals For Car Models
-
 Chevrolet Sonic
 -
 Citroen C3
 -
 Fiat Punto
 -
 Honda Fit
 -
 Mazda 2
 -
 Nissan Micra
 -
 Peugeot 208
 -
 Renault Clio
 -
 Seat Ibiza
 -
 Skoda Fabia
 - Honda Pilot
- Volkswagen ID4
- Toyota Prius