
Seat Ibiza: Jump-starting
Seat Ibiza Owners Manual
Jump leads
The jump lead must have a sufficient wire cross section. If the engine fails to start because of a discharged battery, the battery can be connected to the battery of another vehicle to start the engine.
Jump leads
Jump leads must comply with the standard DIN 72553 (see manufacturer's documentation). The wire cross section must be at least 25 mm2 for petrol engines and at least 35 mm2 for diesel engines.

Note
• The vehicles must not touch each other, otherwise electricity could flow as soon as the positive terminals are connected.
• The discharged battery must be properly connected to the vehicles electrical system.
How to jump start: description
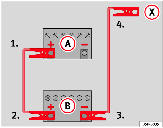
Fig. 170 How to connect the jump leads
In ⇒ fig. 170, the flat battery is 
and the charged battery  .
.
Jump lead terminal connections
– Switch off the ignition on both vehicles ⇒
 .
.
1. Connect one end of the red jump lead to the positive ⇒ fig. 170
 terminal of the vehicle with the flat
battery ⇒  .
.
2. Connect the other end of the red jump lead to the positive terminal
 in the vehicle providing assistance.
3. Connect one end of the black jump lead to the negative terminal
 on the battery of the vehicle providing
assistance.
4. Connect the other end of the black jump lead
 to a solid metal component which is
bolted on to the engine block, or onto the engine block itself of the vehicle with
the flat battery. Do not connect it to a point near the battery ⇒
 .
.
5. Position the leads in such a way that they cannot come into contact with any moving parts in the engine compartment.
Starting
6. Start the engine of the vehicle with the boosting battery and let it run at idling speed.
7. Start the engine of the car with the flat battery and wait one or two minutes until the engine is “running”.
Removing the jump leads
8. Before you remove the jump leads, switch off the headlights (if they are switched on).
9. Turn on the heater blower and rear window heater in the vehicle with the flat battery. This helps minimise voltage peaks which are generated when the leads are disconnected.
10. When the engine is running, disconnect the leads in reverse order to the details given above.
Connect the battery clamps so they have good metal-to-metal contact with the battery terminals. If the engine fails to start, switch off the starter after about 10 seconds and try again after about half a minute.
WARNING
• Please note the safety warnings referring to working in the engine compartment, “Working in the engine compartment”.
• The battery providing assistance must have the same voltage as the flat battery (12V) and approximately the same capacity (see imprint on battery). Failure to comply could result in an explosion.
• Never use jump leads when one of the batteries is frozen. Danger of explosion! Even after the battery has thawed, battery acid could leak and cause chemical burns. If a battery freezes, it should be replaced.
• Keep sparks, flames and lighted cigarettes away from batteries, danger of explosion. Failure to comply could result in an explosion.
• Observe the instructions provided by the manufacturer of the jump leads.
• Do not connect the negative cable from the other vehicle directly to the negative terminal of the flat battery. The gas emitted from the battery could be ignited by sparks. Danger of explosion.
• Do not attach the negative cable from the other vehicle to parts of the fuel system or to the brake line.
• The non-insulated parts of the battery clamps must not be allowed to touch. The jump lead attached to the positive battery terminal must not touch metal parts of the vehicle, this can cause a short circuit.
• Position the leads in such a way that they cannot come into contact with any moving parts in the engine compartment.
• Do not bend over the batteries. This could result in chemical burns.

Note
The vehicles must not touch each other, otherwise electricity could flow as soon as the positive terminals are connected.


Other info:
Renault Clio. Vehicle identification plate
The information shown on the vehicle
identification plate should be
quoted on all correspondence or
orders.
The presence and location of the information
depends on the vehicle.
Vehic ...
Chevrolet Sonic. Automatic Headlamp System
When it is dark enough outside and the exterior lamp control is in the automatic
position, the headlamps come on automatically. See Exterior Lamp Controls.
The vehicle has a light sensor on top o ...
Chevrolet Sonic. DIC Menu Items
Press MENU to view the DIC menus. Some items display in the upper display area,
some in the lower display area, and others use both the upper and lower display
areas. Use to scroll through the me ...
Manuals For Car Models
-
 Chevrolet Sonic
 -
 Citroen C3
 -
 Fiat Punto
 -
 Honda Fit
 -
 Mazda 2
 -
 Nissan Micra
 -
 Peugeot 208
 -
 Renault Clio
 -
 Seat Ibiza
 -
 Skoda Fabia