
Seat Ibiza: Vehicle tools, spare wheel
Seat Ibiza Owners Manual
Vehicle Tools
The vehicle onboard tools are located under the floor panel in the luggage compartment.
– Lift floor panel
– Take the onboard tools out of the vehicle.
The tool kit includes:
• Jack*
• Hook for removing wheel covers* or hub caps*
• Box spanner for wheel bolts*
• Reversible screwdriver with handle (including hexagonal interior) for the wheel bolts. The screwdriver is a combination tool.
• Towing ring*
• Adapter for the anti-theft wheel bolts*
Some of the items listed are only provided in certain models / model years, or are optional extras.
WARNING
• Do not use the hexagonal socket in the screwdriver handle to tighten the wheel bolts as with this it is not possible to tighten the bolts to the required torque, risk of accident.
• The jack supplied by the factory is only designed for changing wheels on this model. On no account attempt to use it for lifting heavier vehicles or other loads, risk of injury.
• Use the jack only on firm, level ground.
• Never start the engine when the vehicle is on the jack, risk of accident.
• If work is to be carried out underneath the vehicle, this must be secured by suitable stands. Otherwise, there is a risk of injury.
Tool box only for 17 inch wheel* - Cupra Version
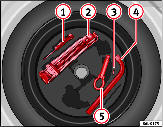
Fig. 136 Tool box
On-board tools*/Jack*
The vehicle may also have:
1.
Screwdriver with handle (including hexagonal interior) for the wheel bolts. The screwdriver blade is reversible.
2.
Jack. Before replacing the jack in its compartment, fully insert the arm. Then, push the crank against the side of the jack.
3.
Wire hook
4.
Box spanner for wheel bolts
5.
Towing eye
WARNING
• The jack supplied by the factory is only for this model. It must never be used for other heavier vehicles or for other loads.
• Never start the engine when the car is raised. Risk of accident.
• When work is being carried out underneath the vehicle, it must be secured using suitable frames.

Note
Never use the inner hexagon of the screwdriver for loosening or tightening the wheel bolts.
Compact temporary spare wheel
If provided as part of the vehicle's equipment, the compact temporary spare wheel is only intended for temporary use over short distances. The temporary spare wheel is stored under the floor panel in the luggage compartment and is attached by a thumbnut.
How to use the compact temporary spare wheel
Should you ever have a punctured tyre, the compact temporary spare wheel is only intended for temporary use until you can reach a workshop. The standard-size road wheel should be replaced as soon as possible. Please note the following restrictions when using the compact temporary spare wheel. This spare wheel has been specially designed for your vehicle, thus, it cannot be changed with the spare wheel from another vehicle. No other type of tyre (normal summer or winter tyre) may be fitted on the compact temporary spare wheel rim.
Snow chains
For technical reasons, snow chains must not be used on the compact temporary spare wheel.
If you should have a puncture on one of the front wheels when using snow chains, fit the compact temporary spare in place of one of the rear wheels. You can then attach the snow chains to the wheel taken from the rear and use this wheel to replace the punctured front wheel.
WARNING
• The tyre pressures must be checked and corrected as soon as possible.
• Do not drive faster than 80 km/h. Higher speeds can cause an accident.
• Avoid heavy acceleration, hard braking and fast cornering, risk of accident.
• Never use two or more compact spare tyres at the same time, risk of accident.
• No other type of tyre (normal summer or winter tyre) may be fitted on the compact temporary spare wheel rim.
17 inch* spare wheel - Cupra version
The wheel is in a well under the carpet of the boot, secured with a threaded plastic nut.
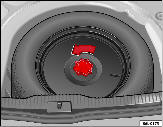
Fig. 137 Access to the spare wheel
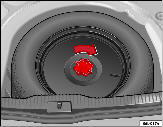
Fig. 138 Securing the defective wheel in the spare wheel well
Taking out the spare wheel
– Lift the carpet, then remove the plastic nut anticlockwise. – Take out the tool box* and remove the spare wheel.
Securing the defective wheel in the spare wheel well
– Put the defective wheel into its housing, and then put the tool box* into the hollow in the wheel. – Turn the plastic nut clockwise until the defective wheel is well secured. – Unhook the carpet and place it on the floor.
WARNING
Check the spare wheel and the tools are firmly held to avoid injury to passengers in the event of sudden braking or collision.
Tyre repair kit
The tyre repair kit (for vehicles not including a spare wheel) is stored under the floor panel in the luggage compartment. Your vehicle is equipped with the Tyre Mobility System “Tyre repair kit”. The tyre repair kit consists of a container with sealing compound to repair the puncture and a compressor to generate the required tyre pressure. The kit will reliably seal punctures up to a size of about 4 mm caused by the penetration of a foreign body into the tyre.

Note
• Seek professional assistance if the repair of a tyre puncture is not possible with the sealing compound.


Other info:
Peugeot 208. Description of the kit
A. "Sealant" or "Air" position selector.
B. On "I" / off "O" switch.
C. Deflation button.
D. Pressure gauge (in bar or p.s.i.).
E. Compartment housing:
- ...
Honda Fit. Airbag Care
You do not need to, and should not, perform any maintenance on or replace any
airbag system components yourself. However, you should have your vehicle
inspected by a dealer in the following situatio ...
Chevrolet Sonic. Engine Heater
The engine heater can provide easier starting and better fuel economy during
engine warm-up in cold weather conditions at or below −18°C (0°F). Vehicles with
an engine heater should be plu ...
Manuals For Car Models
-
 Chevrolet Sonic
 -
 Citroen C3
 -
 Fiat Punto
 -
 Honda Fit
 -
 Mazda 2
 -
 Nissan Micra
 -
 Peugeot 208
 -
 Renault Clio
 -
 Seat Ibiza
 -
 Skoda Fabia
 - Honda Pilot
- Volkswagen ID4
- Toyota Prius