
Skoda Fabia: Checking the oil level
Skoda Fabia Owners Manual
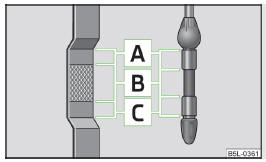
Fig. 128 Principle sketch: Dipstick
The dipstick indicates the engine oil level » Fig. 128.
Checking the oil level
Ensure that the vehicle is positioned on a level surface and the engine has reached its operating temperature.
- Switch off the engine.
Wait a few minutes until the engine oil flows back into the sump.
- Open the bonnet.
- Pull out the dipstick.
- Wipe the dipstick with a clean cloth and insert it again to the stop.
- Pull the dipstick out again and check the oil level.
Oil level within range A
No oil must be refilled.
Oil level within range B
Oil can be refilled. The oil level may lie in range A .
Oil level within range C
The engine must be topped up with oil so that the oil level at least reaches range B .
The engine burns some oil. The oil consumption may be as much as 0.5 l/ 1 000 km depending on your style of driving and the conditions under which you operate your vehicle. Consumption may be slightly higher than this during the first 5 000 kilometres.
The oil level must be checked at regular intervals. We recommend it be checked after each time you refuel or prior to making a long journey.
We recommend maintaining the oil level within the range A , but not above, if the engine has been operating at high loads, for example, during a lengthy motorway trip during the summer months, towing a trailer or negotiating a high mountain pass.
The warning light in the instrument cluster will indicate whether the oil level
is
too low » page 36,  Engine oil.
Check the oil level using the dipstick as
soon as possible. Add oil accordingly.
CAUTION
- Always check the oil level on vehicles with the 1.2 l/44 kW engine when the engine is cold. Otherwise the measuring result is incorrect und oil could be incorrectly replenished - risk of engine damage!
- The oil level must never be above the A range » Fig. 128 – there is a risk of damaging the exhaust system.
Replenishing
- Check the oil level » page 143.
- Unscrew the cap of the engine oil filler opening » Fig. 126 on page 141.
- Replenish the oil in portions of 0.5 litres in accordance with the correct specifications » page 142.
- Check the oil level » page 143.
- Carefully screw on the oil filler opening cap and push the dipstick in fully.
Changing
The engine oil must be changed according to prescribed service intervals or according to the » Service plan service interval display


Other info:
Nissan Micra. Storage
Map pockets
Storage trays (if so equipped)
Storage compartment
WARNING
Do not place sharp objects in the trays to
help prevent injury in an accident or sudden
stop.
...
Peugeot 208. Leaving cruise control mode
Turn thumb wheel 1 to the "0" position: the cruise control mode is deselected.
The display returns to the distance recorder.
...
Seat Ibiza. Fuses
Changing a fuse
If a fuse has blown it must be replaced
Fig. 146 Fuses in the dash panel
fuse cover
– Switch off the ignition and the component concerned. – Identify the fuse for
the faile ...
Manuals For Car Models
-
 Chevrolet Sonic
 -
 Citroen C3
 -
 Fiat Punto
 -
 Honda Fit
 -
 Mazda 2
 -
 Nissan Micra
 -
 Peugeot 208
 -
 Renault Clio
 -
 Seat Ibiza
 -
 Skoda Fabia
 - Honda Pilot
- Volkswagen ID4
- Toyota Prius