
Citroen C3: Temporary puncture repair kit
Citroen C3 Owners Manual
Complete system consisting of a compressor and an incorporated sealant cartridge which permits temporary repair of the tyre so that you can drive to the nearest garage.
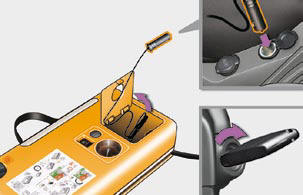
Access to the kit
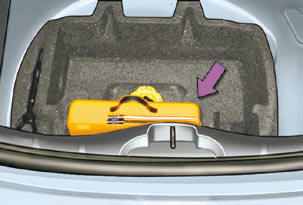
The kit is mounted in the boot under the fl oor.
This repair kit is available from CITROËN dealers.
It is designed to repair holes of a maximum diameter of 6 mm, only where the puncture is located on the tyre tread or shoulder. Avoid removing any foreign bodies which have penetrated the tyre.
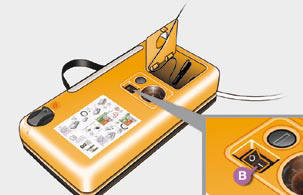
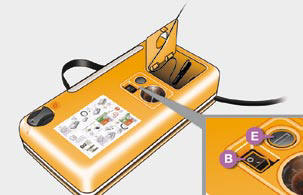
Using the kit
This procedure, comprising several steps, must be carried out in full.
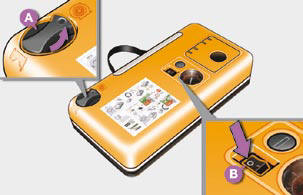
- Switch off the ignition.
- Turn the selector A to the "SEALANT" position.
- Check that the switch B is in position "0" .
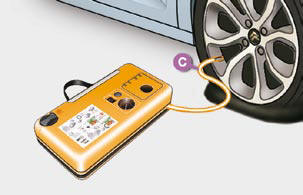
Connect the white pipe C to the valve of the tyre to be repaired.
- Connect the compressor's electric plug to the vehicle's 12 V socket.
- Affi x the speed limitation sticker to the vehicle's steering wheel to remind you that a wheel is in temporary use.
- Start the vehicle and leave the engine running.
- Switch on the compressor by moving the switch B to position "1" until the tyre pressure reaches 2.5 bars.
- Remove the kit, taking care to avoid to avoid staining your vehicle with traces of fl uid. Keep the kit to hand.
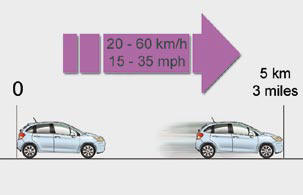
- Drive immediately for approximately three miles (fi ve kilometres), at reduced speed (between 15 and 35 mph [20 and 60 km/h]), to plug the puncture.
- Stop to check the repair and the tyre pressure using the kit.
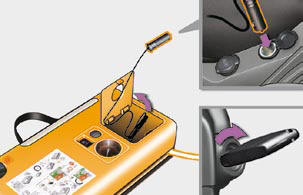
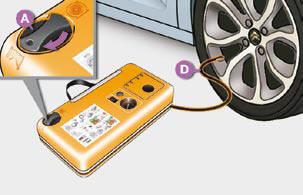
- Turn the selector A to the AIR position.
- Connect the black pipe D to the valve of the wheel.
If after around 5 to 7 minutes the pressure is not attained, this indicates that the tyre is not repairable; contact a CITROËN dealer for assistance.
Checking/Adjusting tyre pressures
You can also use this kit for the routine check and adjustment of the tyre pressures on your vehicle. For this, carry out just the following 6 points.
- Connect the compressor's electric plug to the vehicle's 12 V socket.
- Start the vehicle again and leave the engine running.
- Adjust the pressure using the compressor (to infl ate: switch B in position "1" ; to defl ate: switch B in position "0" and press button E ), in accordance with the vehicle's tyre pressure label (located on the left hand door aperture). A loss of pressure indicates that the puncture has not been fully plugged; contact a CITROËN dealer for assistance.
- Remove and stow the kit.
- Drive at reduced speed (50 mph [80 km/h] max) limiting the distance travelled to approximately 120 miles (200 km).
Go to a CITROËN dealer as soon as a possible. Have the tyre inspected by a technician, who can then advise you whether it can be repaired or should be replaced.
Take care, the fl uid contains ethylene-glycol. This product is harmful if swallowed and causes irritation to the eyes. Keep it out of reach of children.
The expiry date of the fl uid is indicated on the cartridge.
The sealant cartridge is designed for single use; even if only partly used, it must be replaced. To remove the cartridge, turn it a quarter turn at its cap and pull off.
After use, do not discard the cartridge into the environment, take it to an authorised waste disposal site or a CITROËN dealer. Do not forget to obtain a new sealant cartridge, available from CITROËN dealers.


Other info:
Chevrolet Sonic. Finish Care
Application of aftermarket clearcoat sealant/wax materials is not recommended.
If painted surfaces are damaged, see your dealer to have the damage assessed and
repaired. Foreign materials such as ...
Fiat Punto. Seats
FRONT SEATS
Moving the seat backwards or forwards
Lift the lever (A) (on seat internal side) and push the seat forwards or
backwards: in the driving position the arms should rest on the rim of the
...
Nissan Micra. Forward-facing child restraint installation
using the seat belts
WARNING
The three-point seat belt with Automatic
Locking Retractor (ALR) must be used
when installing a child restraint. Failure to
use the ALR mode will result in the child
rest ...
Manuals For Car Models
-
 Chevrolet Sonic
 -
 Citroen C3
 -
 Fiat Punto
 -
 Honda Fit
 -
 Mazda 2
 -
 Nissan Micra
 -
 Peugeot 208
 -
 Renault Clio
 -
 Seat Ibiza
 -
 Skoda Fabia
 - Honda Pilot
- Volkswagen ID4
- Toyota Prius