
Honda Fit: Adjusting the Seat Positions
Honda Fit Owners Manual
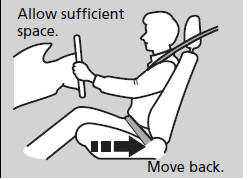
Adjust the driver’s seat as far back as possible while allowing you to maintain full control of the vehicle. You should be able to sit upright, well back in the seat and be able to adequately press the pedals without leaning forward, and grip the steering wheel comfortably. The passenger’s seat should be adjusted in a similar manner, so that it is as far back from the front airbag in the dashboard as possible.
■ Adjusting the front seat

Once a seat is adjusted correctly, rock it back and forth to make sure it is locked in position.
Adjusting the Seat-Backs
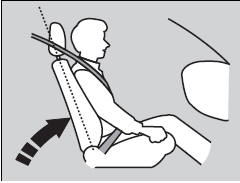
Adjust the driver’s seat-back to a comfortable, upright position, leaving ample space between your chest and the airbag cover in the center of the steering wheel.
The front seat passenger should also adjust their seat-back to a comfortable, upright position.
Reclining a seat-back so that the shoulder part of the belt no longer rests against the occupant’s chest reduces the protective capability of the belt. It also increases the chance of sliding under the belt in a crash and being seriously injured. The farther a seat-back is reclined, the greater the risk of injury.
WARNING
Reclining the seat-back too far can result in
serious injury or death in a crash.
Adjust the seat-back to an upright position, and sit well back in the seat.
Do not put a cushion, or other object, between the seat-back and your back.
Doing so may interfere with proper seat belt or airbag operation.
If you cannot get far enough away from the steering wheel and still reach the controls, we recommend that you investigate whether some type of adaptive equipment may help.
Adjusting the Head Restraints
Your vehicle is equipped with head restraints in all seating positions.
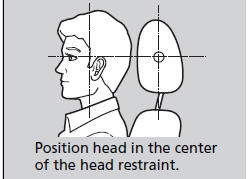
Head restraints are most effective for protection against whiplash and other rearimpact crash injuries when the center of the back of the occupant’s head rests against the center of the restraint. The tops of the occupant’s ears should be level with the center height of the restraint.
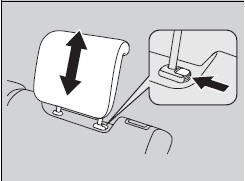
■ Adjusting the front head restraint positions
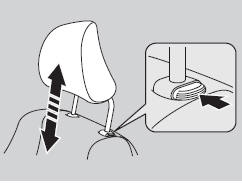
To raise the head restraint:
Pull it upward.
To lower the head restraint:
Push it down while pressing the release button.
WARNING
Improperly positioning head restraints
reduces their effectiveness and increases
the likelihood of serious injury in a crash.
Make sure head restraints are in place and positioned properly before driving.
The driver’s and front passenger’s seats have active head restraints.
Changing the Rear Seat Head Restraint Positions
A passenger sitting in a back seating position should adjust the height of their head restraint to an appropriate position before the vehicle begins moving.
To raise the head restraint:
Pull it upward.
To lower the head restraint
: Push it down while pressing the release button.
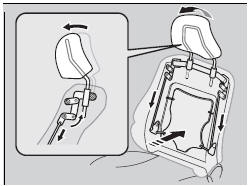
Removing and Reinstalling the Head Restraints
Head restraints can be removed for cleaning or repair.
To remove a head restraint:
Pull the restraint up as far as it will go. Then push the release button, and pull the restraint up and out.
To reinstall a head restraint:
Insert the legs back in place, then adjust the head restraint to an appropriate height while pressing the release button. Pull up on the restraint to make sure it is locked in position.
Failure to reinstall, or correctly reinstall, the head restraints can result in severe injury during a crash.
Always replace the head restraints before driving.
Active Head Restraints
The driver’s and front passenger’s seats have active head restraints. In a rear impact, an occupant properly secured by a seat belt will be pushed against the seat-back and the head restraint will move forward. This reduces the distance between the restraint and the occupant’s head, which helps reduce the likelihood of whiplash and injuries to the neck and upper spine.
In order for the active head restraints to operate
properly:
• Do not hang any items on the head restraints, or
from the restraint legs.
• Do not place any objects between an occupant and the seat-back.
• Install each restraint in its proper location.
After a collision, the activated restraint should return to its normal position. If the restraint does not return to its normal position, or in the event of a severe collision, have the vehicle inspected by a dealer.
Maintain a Proper Sitting Position
After all occupants have adjusted their seats and head restraints, and put on their seat belts, it is very important that they continue to sit upright, well back in their seats, with their feet on the floor, until the vehicle is safely parked and the engine is off.
Sitting improperly can increase the chance of injury during a crash. For example, if an occupant slouches, lies down, turns sideways, sits forward, leans forward or sideways, or puts one or both feet up, the chance of injury during a crash is greatly increased.
In addition, an occupant who is out of position in the front seat can be seriously or fatally injured in a crash by striking interior parts of the vehicle or being struck by an inflating front airbag.
WARNING
Sitting improperly or out of position can
result in serious injury or death in a crash.
Always sit upright, well back in the seat, with your feet on the floor.


Other info:
Skoda Fabia. Engine compartment overview
Fig. 126 Principle sketch: Engine compartment
Explanation of graphic » Fig. 126
Coolant expansion reservoir
Windscreen washer fluid reservoir
Engine oil filler opening
Engine oil dipst ...
Fiat Punto. If an interior light burns out
For the type of bulb and power rating, see “When needing to change a
bulb”.
CEILING LIGHT
With toggling lens
To change the bulb, proceed as follows:
remove the ceiling light by releasing t ...
Citroen C3. USB reader
This connection box, consisting of a
JACK socket and a USB port, is located
on the centre console.
It permits the connection of portable
equipment, such as a digital audio player
of the iPo ...
Manuals For Car Models
-
 Chevrolet Sonic
 -
 Citroen C3
 -
 Fiat Punto
 -
 Honda Fit
 -
 Mazda 2
 -
 Nissan Micra
 -
 Peugeot 208
 -
 Renault Clio
 -
 Seat Ibiza
 -
 Skoda Fabia
 - Honda Pilot
- Volkswagen ID4
- Toyota Prius