
Skoda Fabia: Windscreen wipers and washers
Skoda Fabia Owners Manual
The windscreen wipers and the windscreen washer system only operate when the ignition is switched on.
The rear window is wiped once automatically if the windscreen wipers are on when reverse gear is selected.
Top up with windscreen wiper fluid » page 141.
WARNING
- Properly maintained windscreen wiper blades are essential for clear visibility and safe driving » page 64.
- Do not use the windscreen washer system at low temperatures, without heating the windscreen beforehand. Otherwise the window cleaner could freeze on the windscreen and restrict the view to the front.
- Replace the windscreen wiper blades once or twice a year for
safety reasons.
These can be purchased from a ŠKODA Partner.
CAUTION
- In cold temperatures and during the winter, check before the journey or before switching on the ignition that the wiper blades are not frozen to the windscreen. If the windscreen wipers are switched on when the blades are frozen to the windscreen, this may damage both the blades and windscreen wiper motor!
- If the ignition is switched off while the windscreen wipers are switched on, the windscreen wipers will continue wiping in the same mode after the ignition is turned back on. The windscreen wipers could freeze up in cold temperatures between the time the ignition was turned off and when it was turned back on again.
- Carefully detach frozen wiper blades from the front or rear window.
- Remove snow and ice from the windscreen wipers before driving.
- If the windscreen wipers are handled carelessly, there is a risk of damage to the windscreen.
Note
- The windscreen washer nozzles for the windscreen are heated when the engine is running and the outside temperature is less than approx. +10 °C.
- The content of the windscreen washer fluid reservoir is 3.5 litres. On vehicles fitted with the headlight cleaning system, the volume is around 5.4 litres.
- The wiper blades should be cleaned on a regular basis with a windscreen cleaner to avoid any smears. The wiper blades should be cleaned with a sponge or cloth if they are heavily soiled by insect residues, for example.
Windscreen wiper and washer
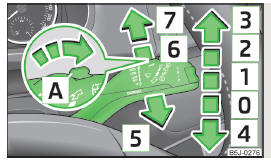
Fig. 50 Operating stalk: Windscreen wipers and washer settings
Control stalk positions » Fig. 50.
0 Wipers off
- Interval windscreen wiping
- Slow windscreen wiping
- Rapid windscreen wiping
- Single windscreen wipe (spring-loaded position)
- Automatic wipe/wash for windscreen (spring-loaded position)
- Wiping the rear window (the wiper wipes at regular intervals after a few seconds)
- Automatic wipe/wash for the rear window (spring-loaded position)
A Switch for setting the desired interval between the individual windscreen wipes ( 1 Interval windscreen wiping)
Automatic wipe/wash for windscreen
The wash system operates immediately, the windscreen wipers wipe somewhat later.
Releasing the lever will stop the windscreen washer while the wipers continue for another 1 to 3 wiper strokes (depending on the period the windscreen has been sprayed).
Automatic wipe/wash for the rear window
The wash system operates immediately, the wiper wipes somewhat later.
Releasing the lever will stop the washer while the wipers continue for another 1 to 3 wiper strokes (depending on the period the window has been sprayed).
The lever will stay in position after releasing it 6 .
Headlight cleaning system
The headlights are sprayed briefly if the low beam or main beam are switched on and the windscreen wiper stalk is pulled to position 5 » Fig. 50 on page 63. To clean the headlights, the windshield is also sprayed after every five squirts.
You should remove stubborn dirt (such as insect residues) from the headlight lenses at regular intervals, for example when refuelling. The following guidelines must be observed » page 132, Headlight lenses.
To ensure the proper operation of the cleaning system during the winter, any snow should be removed from the washer nozzle fixtures and ice should be cleared with a de-icing spray.
CAUTION
Never remove the nozzles from the headlight cleaning system by hand – there is risk of damage.
Replacing the windscreen wiper blades
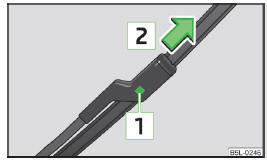
Fig. 51 Windscreen wiper blade
Removing the wiper blade
- Lift the windscreen wiper arm away from the windscreen.
- Press the locking button 1 » Fig. 51 and remove the wiper blade in the direction of arrow 2 .
Fitting the wiper blade
- Push the wiper blade in until it latches on the stop.
- Check that the wiper blade is correctly attached.
- Fold the wiper arms back to the windscreen.
Windshield wiper blades in proper condition are essential to obtain good visibility.
Wiper blades should not be allowed to become dirtied by dust, insect remains and preserving wax.
Juddering or smearing of the wiper blades could then be due to wax residues left on the windshield by vehicle washing in automatic vehicle wash systems.
It is therefore important to degrease the lips of the windshield wiper blades after every pass through an automatic vehicle wash system
Replacing the rear window wiper blade
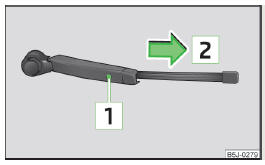
Fig. 52 Rear window wiper blade
Removing the wiper blade
- Raise the wiper arm away from the window » Fig. 52.
- Tilt the wiper blade to the stop in the direction of the wiper arm.
- Hold the upper part of the wiper arm and unlock the securing mechanism 1 .
- Remove the wiper blade in the direction of the arrow 2 .
Fitting the wiper blade
- Push the wiper blade in until it latches on the stop.
- Check that the wiper blade is correctly attached.
- Fold the wiper arm back to the windscreen.


Other info:
Chevrolet Sonic. Radio Frequency Statement
This vehicle has systems that operate on a radio frequency that comply with Part
15 of the Federal Communications Commission (FCC) rules and with Industry Canada
Standards RSS‐GEN/210/220/31 ...
Renault Clio. Use
Unlocking the doors and tailgate
Press button 1.
The hazard warning lights flash once
to indicate that the doors have been unlocked.
When unlocking the driver’s door only
is activated:
...
Seat Ibiza. Rearview mirrors
Adjusting the head restraints
Before beginning any journey, adjust the rear-view mirrors for correct visibility.
Interior mirror
It is dangerous to drive if you cannot see clearly through the rear ...
Manuals For Car Models
-
 Chevrolet Sonic
 -
 Citroen C3
 -
 Fiat Punto
 -
 Honda Fit
 -
 Mazda 2
 -
 Nissan Micra
 -
 Peugeot 208
 -
 Renault Clio
 -
 Seat Ibiza
 -
 Skoda Fabia
 - Honda Pilot
- Volkswagen ID4
- Toyota Prius