Fiat Punto: If an exterior light burns out
Fiat Punto Owners Manual
For the type of bulb and power rating, see “When needing to change a bulb”.
FRONT LIGHT UNITS
The front light units contain: sidelights, dipped beam, main beam and direction indicator bulbs.
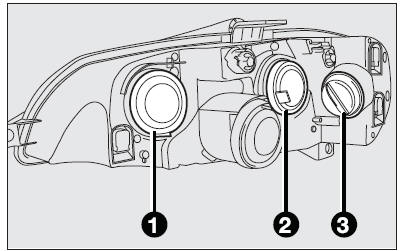
The bulbs are arranged inside the light unit as follows:
- sidelights/main beam headlights;
- dipped beam headlights;
- direction indicators.
IMPORTANT After replacement, refit the covers correctly checking that they are properly secured.
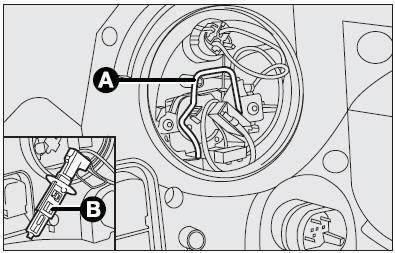
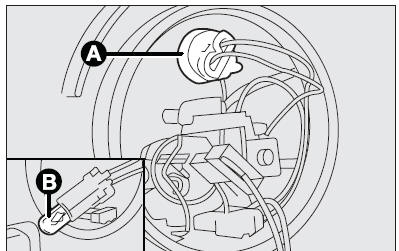
MAIN BEAM HEADLIGHTS
To change the bulb, remove the protective cover (1), release the catch (A) and remove the bulb (B).
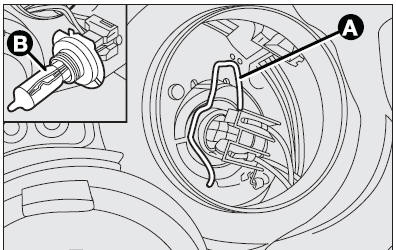
DIPPED BEAM HEADLIGHTS
To change the bulb, remove the protective cover (2), release the catch (A) and remove the bulb (B).
FRONT SIDELIGHTS
To change the bulb, remove the protective cover (1), remove connector (A) and remove the bulb (B).
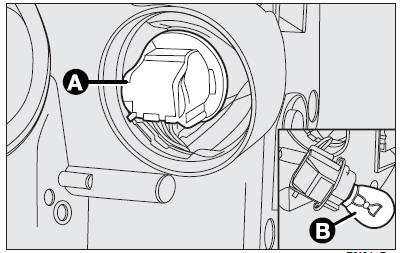
DIRECTION INDICATORS
Front
To change the bulb, remove the protective cover (3), turn connector (A) clockwise and remove the bulb (B).
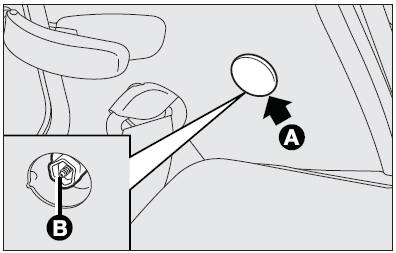
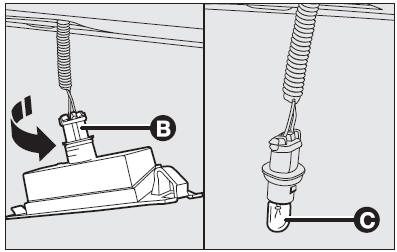
Side
To change the bulb, proceed as follows:
- Press the lens (A) in the direction of the arrow (opposite to running direction) so to compress the clip (B) and remove the cluster;
- Turn the lens (A) counterclockwise and remove it; then remove the snap-fitted bulb (C).
FRONT FOG LIGHTS
Go to a Fiat Dealership to have bulbs replaced.
REAR LIGHT UNIT
To change the bulb, proceed as follows:
- from inside the car, remove the upper plastic cover (A) with the screwdriver provided to reach fastener (B);
- from inside the boot, fit extension (C) on the light cluster fastening nuts;
- insert the provided screwdriver (D) in the hole in the extension and loosen the light cluster fastening nuts;
- withdraw the connector and loosen the fastening screws shown in the figure by the arrows;
- remove the bulbs by pushing them slightly and turning them anticlockwise (bayonet coupling).
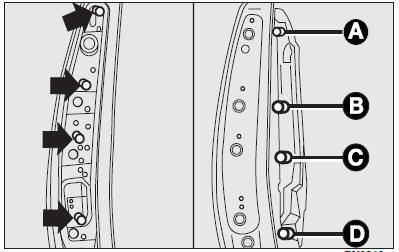
The bulbs are arranged inside the light unit as follows:
- Side/taillight bulb
- Brake light bulb
- Direction indicator bulb
- Bulb for:
- left-hand cluster: rear fog light
- right-hand cluster: reversing light.
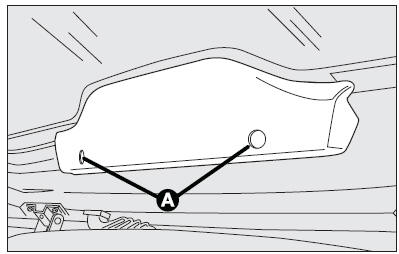
ADDITIONAL BRAKING LIGHT (THIRD STOP)
To change the bulb, proceed as follows:
- open the tailgate and loosen screws (A);
- release the clip (B) and open the bulb holder, the remove the bulb (C) to be replaced (clipped in).
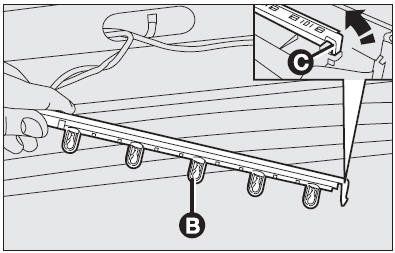
NUMBER PLATE LIGHT
To change the bulb, proceed as follows:
- release the tab (A) and remove the cluster;
- turn the bulb holder (B) anticlockwise and remove the bulb (C).


Other info:
Skoda Fabia. Towing device
If your vehicle has already been factory-fitted with towing equipment or is
fitted
with towing equipment from ŠKODA Original Accessories, then it meets all
of the technical requirements and n ...
Honda Fit. Safety When Performing Maintenance
Some of the most important safety precautions are given here.
However, we cannot warn you of every conceivable hazard that can arise in
performing maintenance. Only you can decide whether or not y ...
Renault Clio. Special features of petrol versions
The following operating conditions:
driving for long periods when the low
fuel level warning light is lit;
using leaded petrol;
using fuel or lubrication additives
which are not approved.
...
Manuals For Car Models
-
 Chevrolet Sonic
 -
 Citroen C3
 -
 Fiat Punto
 -
 Honda Fit
 -
 Mazda 2
 -
 Nissan Micra
 -
 Peugeot 208
 -
 Renault Clio
 -
 Seat Ibiza
 -
 Skoda Fabia
 - Honda Pilot
- Volkswagen ID4
- Toyota Prius