Mazda 2: AUX/USB/iPod mode
Mazda2 Owners Manual
Audio can be heard from the vehicle's speakers by connecting a commerciallyavailable portable audio unit to the auxiliary jack.
A commercially-available, non-impedance (3.5 ) stereo mini plug lead is required.
Contact an expert repairer, we recommend an Authorised Mazda Repairer for details.
In addition, audio can be played from the vehicle audio device by connecting a USB device or an iPod to the USB port.
NOTE
(Type C/Type D) The SD card slot is for the navigation system. For vehicles with the navigation system, the SD card (Mazda genuine) with stored map data is inserted into the SD card slot and used.
Type A/Type B (Without CD player)
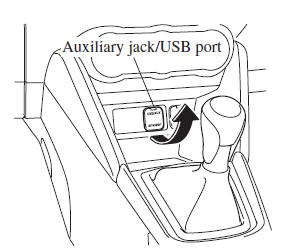
Type A/Type B (With CD player)
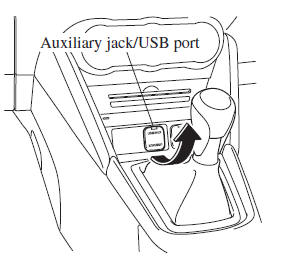
Type C/Type D (Without DVD/CD player)
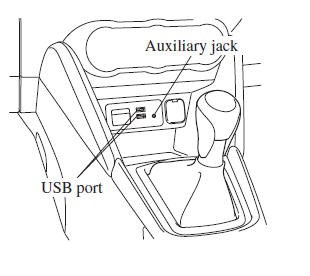
Type C/Type D (With DVD/CD player)

- How to use AUX mode (Type A/Type B)
- How to use USB mode (Type A/Type B)
- How to use iPod mode (Type A/Type B)
- How to use AUX mode (Type C/Type D)
- How to use USB mode (Type C/Type D)
WARNING
Do not adjust the portable audio unit or a similar product while driving the vehicle: Adjusting the portable audio unit or a similar product while driving the vehicle is dangerous as it could distract your attention from the vehicle operation which could lead to a serious accident. Always adjust the portable audio unit or a similar product while the vehicle is stopped.
CAUTION
- Always close the auxiliary jack/ USB port lid when it is not in use. If foreign matter or liquid penetrates the auxiliary jack/USB port, it may cause a malfunction.
- Depending on the portable audio device, noise may occur when the device is connected to the vehicle accessory socket. (If noise occurs, do not use the accessory socket.)
NOTE
- This mode may not be usable depending on the portable audio device to be connected.
- Before using the auxiliary jack/USB port, refer to the instruction manual for the portable audio device.
- Use a commercially-available,
non-impedance (3.5
 ) stereo
mini plug for connecting the portable audio unit to the auxiliary jack.Before using the auxiliary jack, read the manufacturer's instructions for connecting a portable audio unit to the auxiliary jack.
- To prevent discharging of the battery, do not use the auxiliary input for long periods with the engine off or idling.
- When connecting a device to the auxiliary jack or USB port, noise may occur depending on the connected device. If the device is connected to the vehicle's accessory socket, the noise can be reduced by unplugging it from the accessory socket.
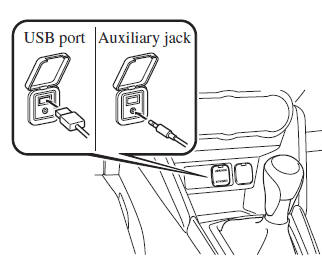
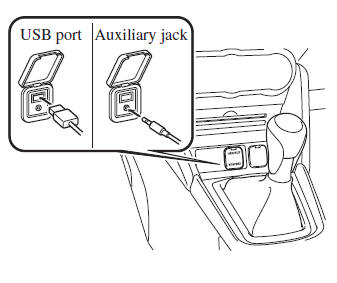
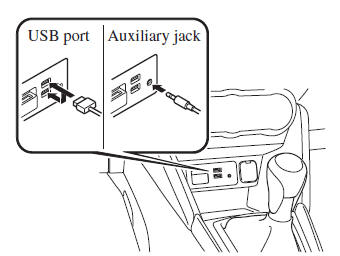
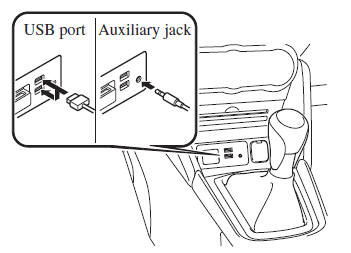
How to connect USB port/ Auxiliary jack
Type A/Type B (Without CD player)
Type A/Type B (With CD player)
Type C/Type D (Without DVD/CD player)
Type C/Type D (With DVD/CD player)
Connecting a device
- If there is a cover on the AUX jack or USB port, remove the cover.
- Connect the connector on the device to the USB port.
Connecting with a connector lead
- If there is a cover on the AUX jack or USB port, remove the cover.
- Connect the device plug/connector lead to the auxiliary jack/USB port.
WARNING
Do not allow the connection plug cord to get tangled with the parking brake or the shift lever: Allowing the plug cord to become tangled with the parking brake or the shift lever is dangerous as it could interfere with driving, resulting in an accident.
CAUTION
Do not place objects or apply force to the auxiliary jack/USB port with the plug connected.
NOTE
- Insert the plug into the auxiliary jack/ USB port securely.
- Insert or pull out the plug with the plug perpendicular to the auxiliary jack/USB port hole.
- Insert or remove the plug by holding its base.
How to use AUX mode (Type A/ Type B)
- Switch the ignition to ACC or ON.
- Press the power/volume dial to turn the audio system on.
- Press the media button (

) of the audio unit to change to the AUX mode.
NOTE
- When the device is not connected to the auxiliary jack, the mode does not switch to the AUX mode.
- Adjust the audio volume using the portable audio device or audio unit.
- Audio adjustments other than audio volume can only be done using the portable audio device.
- If the connection plug is pulled out from the auxiliary jack while in AUX mode, noise may occur.
How to use USB mode (Type A/Type B)
 This unit does not support a USB
3.0
device. In addition, other devices may not
be supported depending on the model or
OS version.
Playback
- Switch the ignition to ACC or ON.
- Press the power/volume dial to turn the audio system on.
- Press the media button (
 )
)
to switch to the USB mode and start playback.
NOTE
- Some devices such as smart phones may require a setting change to allow operation using a USB connection.
- When the USB device is not connected, the mode does not switch to USB mode.
- When there is no playable data in the USB device, “ NO CONTENTS ”is fl ashed.
- Playback of the USB device is in the order of the folder numbers. Folders which have no MP3/WMA/AAC fi les are skipped.
- Do not remove the USB device while in the USB mode. The data may be damaged.
Pause
To stop playback, press the play/pause button ( 4 ).
Press the button again to resume playback.
Fast-forward/Reverse
Press and hold the fast-forward button (
)
to advance through a track at high speed.
Press and hold the reverse button ( 
) to
reverse through a track at high speed.
Track search
Press the track up button (
) once to skip
forward to the beginning of the next track.
Press the track down button ( )
)
within a
few seconds after playback begins to track
down to the beginning of the previous
track.
Press the track down button (  )
)
after a
few seconds have elapsed to start playback
from the beginning of the current track.
Folder search
To change to the previous folder, press the
folder down button (  ), or press the
folder
up button ( ) to advance to the next
folder.
Music Scan
This function scans the titles in a folder currently being played and plays ten seconds of each song to aid you in fi nding a song you want to listen to.
Press and hold the scan button ( )
)
during playback to start the scan play
operation (the track number will fl ash).
Press and hold the scan button (  )
)
again to cancel scan playback.
NOTE
If the unit is left in scan, normal playback will resume where scan was selected.
Repeat playback
Track repeat
- Press the repeat button ( 1 ) during
playback to play the current track
repeatedly. “ TRACK RPT ” is displayed
(
 is displayed next to RPT
at the bottom of the display area). - To cancel the repeat playback, press the button again after 3 seconds.
Folder repeat
- Press the repeat button ( 1 ) during
playback, and then press the button
again within 3 seconds to play the
tracks in the current folder repeatedly.
“ FOLDER RPT ” is displayed (
 is
is
displayed next to RPT at the bottom of the display area). - Press the button again to cancel the repeat playback.
Random playback
Tracks are randomly selected and played.
Folder random
- Press the random button ( 2 ) during
playback to play the tracks in the folder
randomly. “ FOLDER RDM ” is
displayed ( is displayed
next to RDM at the bottom of the display area). - To cancel the random playback, press the button again after 3 seconds.
All random
- Press the random button ( 2 ) during
playback, and then press the button
again within 3 seconds to play the
tracks in the USB device randomly.
“ ALL RDM ” is displayed (
 is
is
displayed next to RDM at the bottom of the display area). - Press the button again to cancel the random playback.
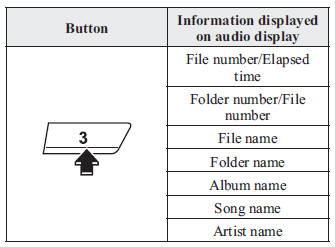
Switching the display
The information displayed on the audio
display changes as follows each time the
text button ( 3 ) is pressed during playback.
NOTE
- The information (artist name, music name) is displayed only when the USB device information in the USB device has information which can be displayed on the screen.
- This unit cannot display some
characters. Characters which cannot
be displayed are indicated by an
asterisk

Display scroll
Only 13 characters can be displayed at one time. To display the rest of the characters of a long title, press and hold the text button ( 3 ). The display scrolls the next 13 characters. Press and hold the text button ( 3 ) again after the last 13 characters have been displayed to return to the beginning of the title.
NOTE
The number of characters which can be displayed is restricted.
Error Messages
When the message “ CHECK USB ” is displayed, it indicates that there is some error in the USB device. Verify that the content recorded in the USB device has MP3/WMA/AAC fi les and re-connect correctly. If the message reappears, have the unit checked by an Authorised Mazda Repairer.
How to use iPod mode (Type A/Type B)
An iPod may not be compatible depending on the model or OS version. In this case, an error message is displayed.
NOTE
The iPod functions on the iPod cannot be operated while it is connected to the unit because the unit controls the iPod functions.
Playback
- Switch the ignition to ACC or ON.
- Press the power/volume dial to turn the audio system on.
- Press the media button (
 )
)
to switch to the iPod mode and start playback.
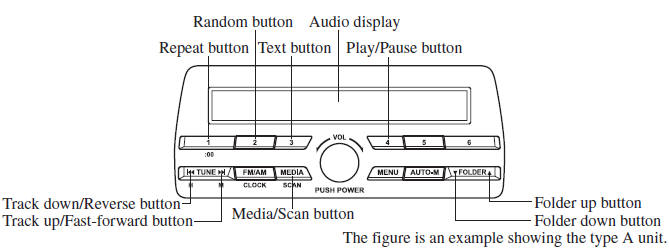
The figure is an example showing the type A unit.
NOTE
- When an iPod is not connected, the mode does not switch to the iPod mode.
- When there is no playable data in the iPod, “ NO CONTENTS ” is fl ashed.
- Do not remove the iPod while in the iPod mode. Otherwise, the data could be damaged.
Pause
To stop playback, press the play/pause button ( 4 ).
Press the button again to resume playback
Fast-forward/Reverse
Press and hold the fast-forward button (
 )
)
to advance through a track at high speed.
Press and hold the reverse button (  )
)
to
reverse through a track at high speed.
Track search
Press the track up button ( )
once to skip
forward to the beginning of the next track.
Press the track down button ( )
)
within a
few seconds (depends on iPod software
version) after playback begins to track
down to the beginning of the previous
track.
Press the track down button (  )
)
after a
few seconds (depends on iPod software
version) have elapsed to start playback
from the beginning of the current track.
Category search
Press the category down button ( 5 ) to select the previous category and press the category up button ( 6 ) to select the next category.
NOTE
The types of categories include Playlist, Artist, Album, Song, Podcast, Genre, Composer, and Audio book.
List search
Press the list down button (  )
)
to select the
previous list and press the list up button
(  ) to select the next list.
NOTE
When the selected category is Song or Audio book, there is no list.
Music Scan
This function scans the titles in a list currently being played and plays 10 seconds of each song to aid you in fi nding a song you want to listen to.
Press and hold the scan button (  )
)
during playback to start the scan play
operation (the track number will fl ash).
Press and hold the scan button (  )
)
again to cancel scan playback.
NOTE
If the unit is left in scan, normal playback will resume where scan was selected.
Repeat playback
- Press the repeat button ( 1 ) during
playback to play the current track
repeatedly. “ TRACK RPT ” is displayed
(
 is displayed next to RPT at
the bottom of the display area). - Press the button again to cancel the repeat playback.
Repeat playback
- Press the repeat button ( 1 ) during
playback to play the current track
repeatedly. “ TRACK RPT ” is displayed
(
 is displayed next to RPT at
the bottom of the display area). - Press the button again to cancel the repeat playback.
Random playback
Tracks are randomly selected and played.
Song random
- Press the random button ( 2 ) during
playback to play the tracks in the list
randomly. “ SONG RDM ” is displayed
(
 is displayed next to RDM at
the bottom of the display area). - To cancel the random playback, press the button again after 3 seconds.
Album random
- Press the random button ( 2 ) during
playback, and then press the button
again within 3 seconds to play the
tracks in the iPod randomly. “ ALBUM
RDM ” is displayed (
 is
is
displayed next to RDM at the bottom of the display area). - Press the button again to cancel the random playback.
NOTE
The track number being played randomly is in the order of the iPod shuffl e table.
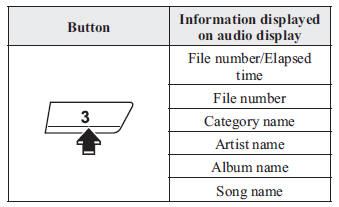
Switching the display
The information displayed on the audio
display changes as follows each time the
text button ( 3 ) is pressed during playback.
NOTE
- The information (artist name, music name) is displayed only when the iPod has information which can be displayed.
- This unit cannot display some
characters. Characters which cannot
be displayed are indicated by an
asterisk

Display scroll
13 characters can be displayed at one time. To display the rest of the characters of a long title, press and hold the text button ( 3 ). The display scrolls the next 13 characters. Press and hold the text button ( 3 ) again after the last 13 characters have been displayed to return to the beginning of the title.
NOTE
The number of characters which can be displayed is restricted.
Error Messages
If the message “ CHECK iPod ” is displayed, it indicates that there is a malfunction in the iPod. Verify that the content recorded in the iPod has playable fi les and connect correctly. If the message reappears, have the unit checked by an Authorised Mazda Repairer.
Error Indications (Type A/Type B)
If you see an error indication on the display, fi nd the cause in the chart. If you cannot clear the error indication, take the vehicle to an expert repairer, we recommend an Authorised Mazda Repairer.
| Indication | Cause | Solution |
| CHECK USB | USB device malfunction | Verify that the content
recorded in the USB
device has MP3/WMA/
AAC fi les and reconnect
correctly.
If the error indication continues to display, consult an expert repairer, we recommend an Authorised Mazda Repairer |
| CHECK iPod | iPod malfunction | Verify that the content
recorded in the iPod has
playable fi les and reconnect
correctly.
If the error indication continues to display, consult an expert repairer, we recommend an Authorised Mazda Repairer. |
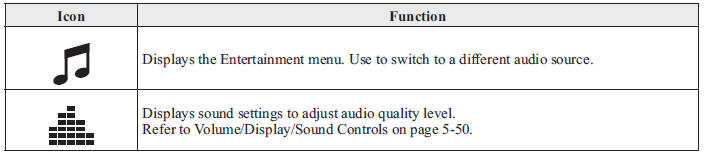
How to use AUX mode (Type C/Type D)
Select the  icon on the home
screen and display the Entertainment screen.
Select to switch to the
AUX mode. The following icons are displayed in the lower
part of the centre display.
NOTE
- If a device is not connected to the auxiliary jack, the mode does not switch to the AUX mode.
- Adjust the audio volume using the portable audio device, commander switch, or audio control switch.
- Audio adjustments can also be made using the portable audio device's volume setting.
- If the connection plug is pulled out from the auxiliary jack while in AUX mode, noise may occur.
How to use USB mode (Type C/Type D)

This unit does not support a USB 3.0 device. In addition, other devices may not be supported depending on the model or OS version.
USB devices formatted to FAT32 are supported (USB devices formatted to other formats such as NTFS are not supported).
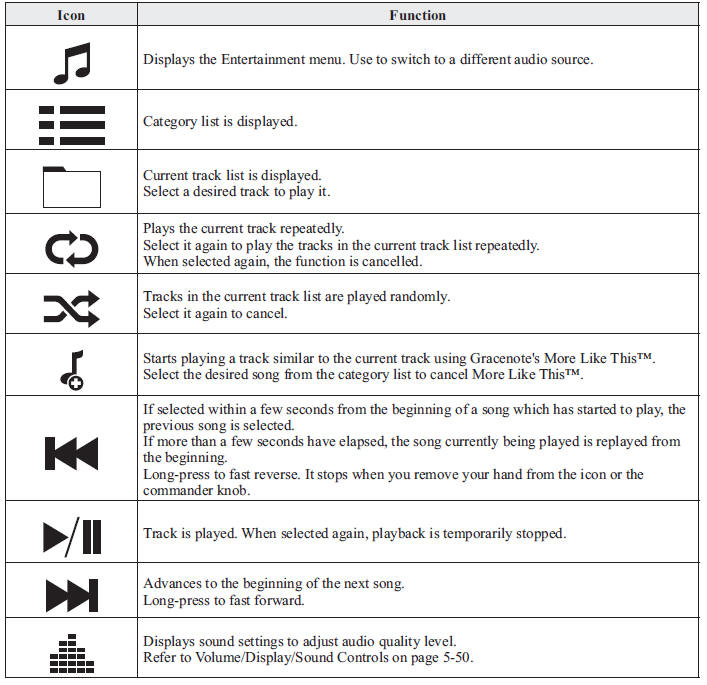
Playback
- Select the
 icon on the home
screen and display the Entertainment screen. - Select
 or
or
 to switch the USB mode. The
following icons are displayed in the lower part of the centre display.
NOTE
- To move to the desired location on the track, move the slider indicating the playback time.
- The appearance of the repeat and shuffl e icons changes depending on the type of operation in which the function is used.
Category list
Select the  icon and display the
following category list.
Select a desired category and item.
| Category | Function |
| Playlist | Displays playlists on the device. |
| Artist | Displays the artist name list.
All the tracks or tracks for each album of the selected artist can be played. |
| Album | Displays the album name list. |
| Song | All the tracks in the device are displayed. |
| Genre | Displays the genre list.
All the tracks or tracks per album or artist in the selected genre can be played. |
| Audiobook | Displays the audiobook list.
Chapters can be selected and played. |
| Podcast | Displays the podcast list.
Episode can be selected and played. (Special service for some Apple devices.) |
| Folder | Displays the folder/fi le list. |
Example of use (to play all tracks in USB device)
(Method 1)
- Select
 to display the
category list. - Select
 .
.
All the tracks in the USB device are displayed.
- Select a desired track.
The selected track is played. All the tracks in the USB device can be played by continuing playback.
NOTE
Only the tracks in the desired category selected in Step 2 are played.
(Method 2) *1
- Select
 to display the
category list. - Select
 .
.
All the folders in the USB device are displayed.
- Select
 .
.
All the tracks in the USB device are displayed.
- Select a desired track.
The selected track is played. All the tracks in the USB device can be played by continuing playback.
*1 Can be operated using an Android™ device or USB fl ash memory.
NOTE
Only the tracks in the desired folder selected in Step 3 are played.
Gracenote Database (Type C/Type D)
When a USB device is connected to this unit and the audio is played, the album name, artist name, genre and title information are automatically displayed if there is a match in the vehicle's database compilation to the music being played. The information stored in this device uses database information in the Gracenote music recognition service.
CAUTION
For information related to the most recent Gracenote database which can be used and how to install it, go to the Mazda Hands Free Website: http://www.mazdahandsfree.com
Introduction
Music recognition technology and related data are provided by Gracenote ® . Gracenote is the industry standard in music recognition technology and related content delivery. For more information visit www.gracenote.com.
CD and music-related data from Gracenote, Inc., copyright © 2000 to present Gracenote.
Gracenote Software, copyright © 2000 to present Gracenote. One or more patents owned by Gracenote apply to this product and service. See the Gracenote website for a nonexhaustive list of applicable Gracenote patents. Gracenote, CDDB, MusicID, MediaVOCS, the Gracenote logo and logotype, and the “Powered by Gracenote” logo are either registered trademarks or trademarks of Gracenote in the United States and/or other countries.
 Gracenote ® End User License
Agreement
This application or device contains software from Gracenote, Inc. of Emeryville,
California
(“Gracenote”. The software from Gracenote (the “Gracenote Software” enables this
application to perform disc and/or fi le identifi cation and obtain
music-related information,
including name, artist, track, and title information (“Gracenote Data” from
online servers
or embedded databases (collectively, “Gracenote Servers” and to perform other
functions.
You may use Gracenote Data only by means of the intended End-User functions of this application or device.
You agree that you will use Gracenote Data, the Gracenote Software, and Gracenote Servers for your own personal non-commercial use only. You agree not to assign, copy, transfer or transmit the Gracenote Software or any Gracenote Data to any third party. YOU AGREE NOT TO USE OR EXPLOIT GRACENOTE DATA, THE GRACENOTE SOFTWARE, OR GRACENOTE SERVERS, EXCEPT AS EXPRESSLY PERMITTED HEREIN.
You agree that your non-exclusive license to use the Gracenote Data, the Gracenote Software, and Gracenote Servers will terminate if you violate these restrictions. If your license terminates, you agree to cease any and all use of the Gracenote Data, the Gracenote Software, and Gracenote Servers. Gracenote reserves all rights in Gracenote Data, the Gracenote Software, and the Gracenote Servers, including all ownership rights. Under no circumstances will Gracenote become liable for any payment to you for any information that you provide. You agree that Gracenote, Inc. may enforce its rights under this Agreement against you directly in its own name.
The Gracenote service uses a unique identifi er to track queries for statistical purposes. The purpose of a randomly assigned numeric identifi er is to allow the Gracenote service to count queries without knowing anything about who you are. For more information, see the web page for the Gracenote Privacy Policy for the Gracenote service.
The Gracenote Software and each item of Gracenote Data are licensed to you “AS IS.” Gracenote makes no representations or warranties, express or implied, regarding the accuracy of any Gracenote Data from in the Gracenote Servers. Gracenote reserves the right to delete data from the Gracenote Servers or to change data categories for any cause that Gracenote deems suffi cient. No warranty is made that the Gracenote Software or Gracenote Servers are error-free or that functioning of Gracenote Software or Gracenote Servers will be uninterrupted. Gracenote is not obligated to provide you with new enhanced or additional data types or categories that Gracenote may provide in the future and is free to discontinue its services at any time.
GRACENOTE DISCLAIMS ALL WARRANTIES EXPRESS OR IMPLIED, INCLUDING, BUT NOT LIMITED TO, IMPLIED WARRANTIES OF MERCHANTABILITY, FITNESS FOR A PARTICULAR PURPOSE, TITLE, AND NON-INFRINGEMENT. GRACENOTE DOES NOT WARRANT THE RESULTS THAT WILL BE OBTAINED BY YOUR USE OF THE GRACENOTE SOFTWARE OR ANY GRACENOTE SERVER. IN NO CASE WILL GRACENOTE BE LIABLE FOR ANY CONSEQUENTIAL OR INCIDENTAL DAMAGES OR FOR ANY LOST PROFITS OR LOST REVENUES.
© 2000 to present. Gracenote, Inc.
Updating the database
The Gracenote media database can be updated using USB device.
- Connect a USB device containing the software for updating Gracenote.
- Select the
 icon on the
home screen and display the Settings screen. - Select the
 tab and select
 .
. - Select
 . The list of the
update package stored in the USB device and the version are displayed. - Select the package to use the update.
- Select

NOTE
Gracenote can be downloaded from the Mazda Hands-free Website.


Other info:
Skoda Fabia. Tailgate
WARNING
Ensure that the lock is properly engaged after closing the boot
lid. Otherwise,
the lid might open suddenly while the vehicle is moving, even if the
lid was locked – risk of accid ...
Honda Fit. Tire Pressure Monitoring System (TPMS) - Required Federal Explanation
U.S. models
Each tire, including the spare (if provided), should be checked monthly when
cold and inflated to the inflation pressure recommended by the vehicle
manufacturer on the vehicle placard o ...
Skoda Fabia. Securing wheels against theft
Fig. 144 Principle sketch: Anti-theft wheel bolt with adapter
The anti-theft wheel bolts can only be removed/tightened with the aid of the
adapter » page 158, Vehicle tool kit.
Remove the c ...
Manuals For Car Models
-
 Chevrolet Sonic
 -
 Citroen C3
 -
 Fiat Punto
 -
 Honda Fit
 -
 Mazda 2
 -
 Nissan Micra
 -
 Peugeot 208
 -
 Renault Clio
 -
 Seat Ibiza
 -
 Skoda Fabia
 - Honda Pilot
- Volkswagen ID4
- Toyota Prius