
Nissan Micra: Forward-facing child restraint installation using LATCH
Nissan Micra Owners Manual
For additional information, refer to all Warnings and Cautions in the “Child safety” and “Child restraints” sections of this manual before installing a child restraint.
Do not use the lower anchors if the combined weight of the child and the child restraint exceeds 65 lbs (29.5 kg). If the combined weight of the child and the child restraint is greater than 65 lbs (29.5 kg), use the vehicle’s seat belt (not the lower anchors) to install the child restraint. Be sure to follow the child restraint manufacturer’s instructions for installation.
Follow these steps to install a forward-facing child restraint using the LATCH system:
- Position the child restraint on the seat. Always follow the child restraint manufacturer’s instructions.
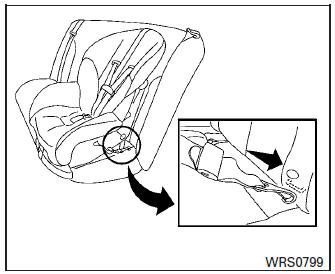
Forward-facing webbing-mounted – step 2
- Secure the child restraint anchor attachments
to the LATCH lower anchors. Check
to make sure the LATCH attachment is properly
attached to the lower anchors.
If the child restraint is equipped with a top tether strap, route the top tether strap and secure the tether strap to the tether anchor point. For additional information, refer to “Installing top tether strap” in this section.
Do not install child restraints that require the use of a top tether strap in seating positions that do not have a top tether anchor.
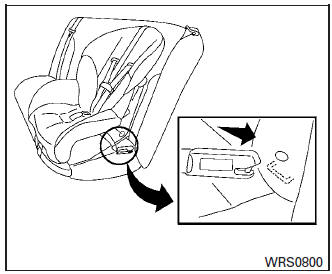
Forward-facing rigid-mounted – step 2
- The back of the child restraint should be
secured against the vehicle seatback.
If necessary, adjust or remove the head restraint/headrest to obtain the correct child restraint fit. If the head restraint/headrest is removed, store it in a secure place. Be sure to reinstall the head restraint/headrest when the child restraint is removed. For additional information about head restraint/headrest adjustment, refer to “Head restraints/headrests” in this section.
If the seating position does not have an adjustable head restraint/headrest and it is interfering with the proper child restraint fit, try another seating position or a different child restraint.
Forward-facing – step 4
- For child restraints that are equipped with
webbing-mounted attachments, remove any
additional slack from the anchor attachments.
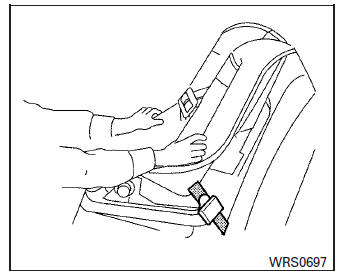
Press downward and rearward firmly in the center of the child restraint with your knee to compress the vehicle seat cushion and seatback while tightening the webbing of the anchor attachments.
- Tighten the tether strap according to the manufacturer’s instructions to remove any slack.
Forward-facing – step 6
- After attaching the child restraint, test it before you place the child in it. Push it from side to side while holding the child restraint near the LATCH attachment path. The child restraint should not move more than 25 mm (1 in), from side to side. Try to tug it forward and check to see if the LATCH attachment holds the restraint in place. If the restraint is not secure, tighten the LATCH attachment as necessary, or put the restraint in another seat and test it again. You may need to try a different child restraint. Not all child restraints fit in all types of vehicles.
- Check to make sure the child restraint is properly secured prior to each use. If the child restraint is loose, repeat steps 1 through 6.
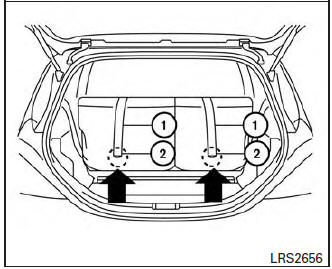
Outboard seating positions
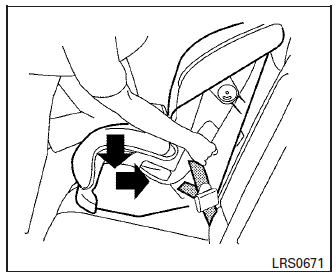
- Top tether strap
- 2 Anchor point
Installing top tether strap
The child restraint top tether strap must be used when installing the child restraint with the LATCH lower anchor attachments.
First, secure the child restraint with the LATCH lower anchors (rear outboard positions only).
Rear bench seat
OUTBOARD SEATING POSITIONS
- Remove the head restraint/headrest and store it in a secure place. Be sure to reinstall the head restraint/headrest when the child restraint is removed. For additional information about head restraint/headrest adjustment, removal and installation, refer to Head restraints/headrests in this section.
- Position the top tether strap 1 over the seatback.
- Secure the tether strap to the tether anchor point 2 on the rear-parcel shelf behind the child restraint.
- Tighten the tether strap according to the manufacturer’s instructions to remove any slack.
| WARNING
Child restraint anchorages are designed
to withstand only those loads imposed by
correctly fitted child restraints. Under no
circumstances are they to be used to attach
adult seat belts, or other items or
equipment to the vehicle. Doing so could
damage the child restraint anchorages.
The child restraint will not be properly installed using the damaged anchorage, and a child could be seriously injured or killed in a collision. |


Other info:
Seat Ibiza. Doors
Locking and unlocking the vehicle
From the outside of the vehicle, the driver's door may be locked or unlocked
using the key.
When opened, the latch will rise up (for vehicles without central ...
Chevrolet Sonic. Radio
Radio Controls without Touchscreen
: Press to turn the system on or
off.
Turn to increase or decrease the volume.
When the system is on, press and release to mute the system. Press and release
...
Honda Fit. Audio System Theft Protection
The audio system is disabled when it is disconnected from the power source,
such as
when the battery is disconnected or goes dead.
■ Entering the Audio Security Code
ENTER CODE appears on ...
Manuals For Car Models
-
 Chevrolet Sonic
 -
 Citroen C3
 -
 Fiat Punto
 -
 Honda Fit
 -
 Mazda 2
 -
 Nissan Micra
 -
 Peugeot 208
 -
 Renault Clio
 -
 Seat Ibiza
 -
 Skoda Fabia
 - Honda Pilot
- Volkswagen ID4
- Toyota Prius