
Ford Fiesta: Audio System
Ford Fiesta 2009-2019 Owners Manual
General Information
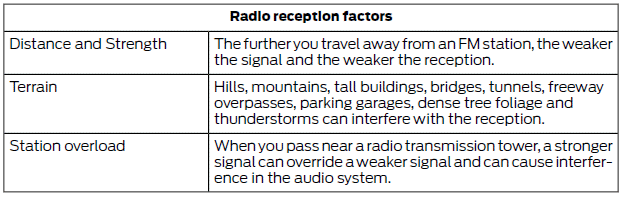
Radio Frequencies and Reception Factors
CD and CD Player Information
Note: CD units play commercially pressed 4.75-inch (12 centimeter) audio compact discs only. Due to technical incompatibility, certain recordable and re-recordable compact discs may not function correctly when used in Ford CD players.
Note: Do not insert CDs with homemade paper (adhesive) labels into the CD player as the label may peel and cause the CD to become jammed. You should use a permanent felt tip marker rather than adhesive labels on your homemade CDs.
Ballpoint pens may damage CDs. Please contact an authorized dealer for further information.
Note: Do not use any irregularly shaped discs or discs with a scratch protection film attached.
Always handle discs by their edges only.
Clean the disc with an approved CD cleaner only. Wipe it from the center of the disc toward the edge. Do not clean in a circular motion.
Do not expose discs to direct sunlight or heat sources for extended periods.
MP3 and WMA Track and Folder Structure
Audio systems capable of recognizing and playing MP3 and WMA individual tracks and folder structures work as follows:
- There are two different modes for MP3 and WMA disc playback: MP3 and WMA track mode (system default) and MP3 and WMA folder mode.
- MP3 and WMA track mode ignores any folder structure on the MP3 and WMA disc. The player numbers each MP3 and WMA track on the disc (noted by the .mp3 or .WMA file extension) from T001 to a maximum of T255. The maximum number of playable MP3 and WMA files may be less depending on the structure of the CD and exact model of radio present.
- MP3 and WMA folder mode represents a folder structure consisting of one level of folders. The CD player numbers all MP3 and WMA tracks on the disc (noted by the .mp3 or .WMA file extension) and all folders containing MP3 and WMA files, from F001 (folder) T001 (track) to F253 T255.
- Creating discs with only one level of folders helps with navigation through the disc files.
If you are burning your own MP3 and WMA discs, it is important to understand how the system reads the structures you create.
While various files may be present, (files with extensions other than mp3 and WMA), only files with the .mp3 and WMA extension are played; other files are ignored by the system. This enables you to use the same MP3 and WMA disc for a variety of tasks on your work computer, home computer and your in-vehicle system.
In track mode, the system displays and plays the structure as if it were only one level deep (all .mp3 files play, regardless of being in a specific folder). In folder mode, the system only plays the .mp3 files in the current folder.
Audio unit - Vehicles With: AM/FM/CD
WARNING
Driving while distracted can result in loss of vehicle control, crash and injury. We strongly recommend that you use extreme caution when using any device that may take your focus off the road. Your primary responsibility is the safe operation of your vehicle. We recommend against the use of any handheld device while driving and encourage the use of voice-operated systems when possible.
Make sure you are aware of all applicable local laws that may affect the use of electronic devices while driving.
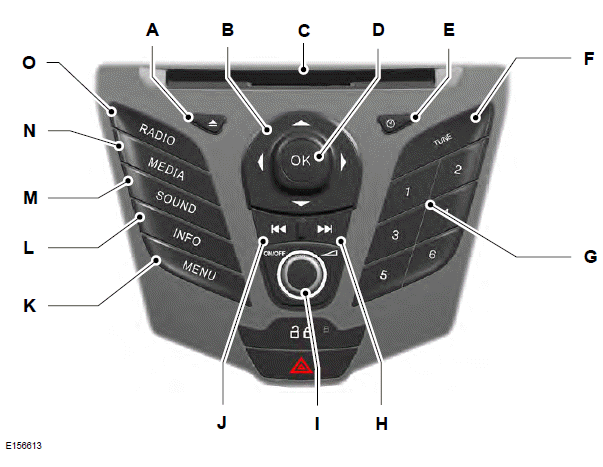
- Eject: Press the button to eject a CD.
- Cursor arrows: Press a button to scroll through on-screen choices.
- CD slot: Where you insert a CD.
- OK: Press the button to confirm on-screen selections.
- Clock: Press to set the time. Use the H and M buttons outside the audio display to adjust the hours and minutes. Press OK to finish. (The clock can also be set by pressing MENU, then scrolling to the clock settings menu.)
- Tune: Press the button to manual tune on AM and FM wavebands.
- Numeric keypad: Press the button to recall a previously stored station. To store a favorite station press and hold until the sound returns.
- Seek up: Press the button to go to the next station up the radio frequency band or the next track on a CD.
- On, Off and Volume: Press the button to switch the audio system on or
off.
Turn the dial to adjust the volume.
- Seek down: Press the button to go to the next station down the radio frequency band or the previous track on a CD.
- MENU: Press the but K ton to access different audio system features.
- INFO: Press the button to access radio or CD information.
- SOUND: Press the button to adjust the sound settings for bass, treble, middle, balance and fade.
- MEDIA: Press the button to access the AUX and SYNC features, it will also cancel the menu or list browsing.
- RADIO: Press the button to select different radio bands, it will also cancel the menu or list browsing.
Sound Button
This will allow you to adjust the sound settings (for example bass, middle and treble).
1. Press the SOUND button.
2. Use the up and down arrow buttons to select the required setting.
3. Use the left and right arrow buttons to make the necessary adjustment. The display indicates the level selected.
4. Press the OK button to confirm the new settings.
Waveband Button
Press the RADIO button to select from the wavebands available.
You can use the selector to return to radio reception when you have been listening to another source.
Alternatively, press the left arrow button to display the available wavebands. Scroll to the required waveband and press OK.
Station Tuning Control
Seek Tuning
Select a waveband and briefly press one of the seek buttons. The unit will stop at the first station it finds in the direction you have chosen.
Manual Tuning
1. Press the MENU button.
2. Select RADIO mode and then Manual.
3. Use the left and right arrow buttons to tune down or up the waveband in small increments or press and hold to increment quickly, until you find a station you want to listen to.
4. Press OK to continue listening to a station.
Scan Tuning
Scan allows you to listen to a few seconds of each station detected.
1. Press the MENU button.
2. Select RADIO mode and then Scan.
3. Use the seek buttons to scan up or down the selected waveband.
4. Press OK to continue listening to a station.
Station Preset Buttons
This feature allows you to store your favorite stations, they can be recalled by selecting the appropriate waveband and pressing one of the preset buttons.
1. Select a waveband.
2. Tune to the station required.
3. Press and hold one of the preset buttons. A progress bar and message will appear. When the progress bar completes the station has been stored.
The audio unit will also mute momentarily as confirmation.
You can repeat this on each waveband and for each preset button.
Note: When you drive to another part of the country, stations that broadcast on alternative frequencies and are stored on preset buttons, may be updated with the correct frequency and station name for that area.
Autostore Control
Note: This will store up to a maximum of the six strongest signals available, either from the AM or the FM waveband and overwrite the previously stored stations. You can also store stations manually in the same way as other wavebands.
- Press and hold the RADIO button.
- When the search is complete, sound is restored and the strongest signals are stored on the autostore presets.
Automatic Volume Control
When available, automatic volume control adjusts the volume level to compensate for engine noise and road speed noise.
1. Press the MENU button and select Audio Settings.
2. Select Spd. Comp. Vol.
3. Use the left or right arrow button to adjust the setting.
4. Press the OK button to confirm your selection.
5. Press the MENU button to return.
News Broadcasts
Your audio unit may interrupt normal reception to broadcast news bulletins from stations on the FM waveband, radio data system or other enhanced network linked stations.
The display will indicate there is an incoming announcement during news broadcasts. When the audio unit interrupts for a news broadcast the preset volume level will be the same as traffic announcements.
1. Press the MENU button.
2. Select Audio Settings.
3. Scroll to News and turn on or off with the OK button.
4. Press the MENU button to return.
Alternative Frequencies
The majority of programs that broadcast on the FM waveband have a program identification code that can be recognized by audio units.
When your vehicle moves from one transmission area to another with the alternative frequencies tuning switched on, this function will search for the strongest station signal.
Under certain conditions, alternative frequencies tuning may temporarily disrupt normal reception.
When selected, the unit continually evaluates signal strength and if a better signal becomes available, the unit will switch to that alternative. It mutes while it checks a list of alternative frequencies and if necessary, it will search once across the selected waveband for a genuine alternative frequency.
It will restore radio reception when it finds one or if one is not found, the unit will return to the original stored frequency.
When selected, AF will be shown in the display.
1. Press the MENU button.
2. Select Audio Settings.
3. Scroll to Alternat. freq. or Alt.
Frequency and turn on or off with the OK button.
4. Press the MENU button to return.
Regional Mode
Regional mode controls the behavior of alternative frequencies switching between regionally related networks of a parent broadcaster. A broadcaster may run a fairly large network across a large part of the country. At various times of the day this large network may be broken down into a number of smaller regional networks, typically centered on major towns or cities.
When the network is not split into regional variants, the whole network carries the same programming.
Regional mode ON: This prevents random alternative frequency switches when neighboring regional networks are not carrying the same programming.
Regional mode OFF: This allows a larger coverage area if neighboring regional networks are carrying the same programming, but can cause random alternative frequency switches if they are not.
1. Press the MENU button.
2. Select Audio Settings.
3. Scroll to RDS regional and turn on or off with the OK button.
4. Press the MENU button to return.
Audio unit - Vehicles With: AM/FM/CD/SYNC
WARNING
Driving while distracted can result in loss of vehicle control, crash and injury. We strongly recommend that you use extreme caution when using any device that may take your focus off the road. Your primary responsibility is the safe operation of your vehicle. We recommend against the use of any handheld device while driving and encourage the use of voice-operated systems when possible.
Make sure you are aware of all applicable local laws that may affect the use of electronic devices while driving.
Note: An integrated multi function display is situated above the unit. This shows important information regarding control of your system. Additionally, there are various icons placed around the display screen which light up when a function is active (for example CD, Radio or Aux).
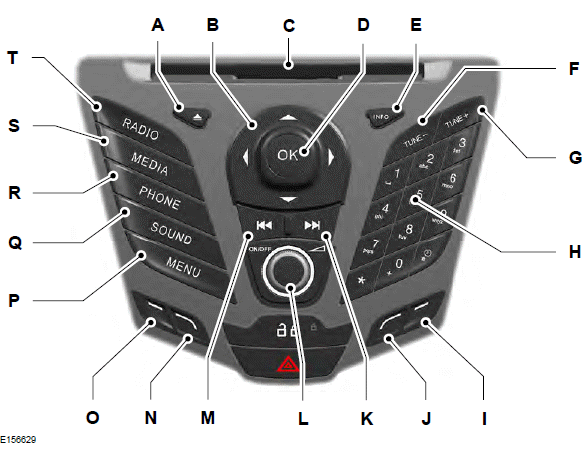
- Eject: Press the button to eject a CD.
- Cursor arrows: Press a button to scroll through on-screen choices.
- CD slot: Where you insert a CD.
- OK: Press the button to confirm on-screen selections.
- INFO: Press the button to access radio, CD, USB and IPod information.
- TUNE -: Press the button to manual tune down the waveband.
- TUNE +: Press the button to manual tune up the waveband.
- Numeric keypad: Press the button to recall a previously stored station. To store a favorite station press and hold until the sound returns.
- Function button 4: Press the button to select different functions of the audio system depending on which mode (i.e. radio or CD) you are in.
- Function button 3: Press the button to select different functions of the audio system depending on which mode (i.e. radio or CD) you are in.
- Seek up: Press the button to go to the next station up the radio frequency band or the next track on a CD.
- On, Off and Volume: Press the button to switch the audio system on or
off.
Turn the dial to adjust the volume.
- Seek down: Press the button to go to the next station down the radio frequency band or the previous track on a CD.
- Function button 2: Press the button to select different functions of the audio system depending on which mode (i.e. radio or CD) you are in.
- Function button 1: Press the button to select different functions of the audio system depending on which mode (i.e. radio or CD) you are in.
- MENU: Press the but P ton to access different audio system features.
- SOUND: Press the button to adjust the sound settings for bass, treble, middle, balance and fade.
- PHONE: Press the button to access the phone feature of the SYNC system by pressing PHONE then MENU. See separate manual.
- MEDIA: Press the button to access the AUX and SYNC features, it will also cancel the menu or list browsing.
- RADIO: Press the button to select different radio bands, it will also cancel the menu or list browsing.
- Descriptions for function buttons 1-4
Function buttons 1 to 4 are context dependent, and change according to the current unit mode. The description for the current function displays in the screen.
Sound Button
This will allow you to adjust the sound settings (for example bass, middle and treble).
- Press the SOUND button.
- Use the up and down arrow buttons to select the required setting.
- Use the left and right arrow buttons to make the necessary adjustment. The display indicates the level selected.
- Press the OK button to confirm the new settings.
Waveband Button
Press the RADIO button to select from the wavebands available.
You can use the selector to return to radio reception when you have been listening to another source.
Alternatively, press the left arrow button to display the available wavebands. Scroll to the required waveband and press OK.
Station Tuning Control
Seek Tuning
Select a waveband and briefly press one of the seek buttons. The unit will stop at the first station it finds in the direction you have chosen.
Manual Tuning
1. Press function button 2.
2. Use the left and right arrow buttons to tune down or up the waveband in small increments or press and hold to increment quickly, until you find a station you want to listen to.
3. Press OK to continue listening to a station.
Scan Tuning
Scan allows you to listen to a few seconds of each station detected.
1. Press function button 3.
2. Use the seek buttons to scan up or down the selected waveband.
3. Press function button 3 again or OK to continue listening to a station.
Station Preset Buttons
This feature allows you to store your favorite stations, they can be recalled by selecting the appropriate waveband and pressing one of the preset buttons.
1. Select a waveband.
2. Tune to the station required.
3. Press and hold one of the preset buttons. A progress bar and message will appear. When the progress bar completes the station has been stored.
The audio unit will also mute momentarily as confirmation.
You can repeat this on each waveband and for each preset button.
Note: When you drive to another part of the country, stations that broadcast on alternative frequencies, and are stored on preset buttons, may be updated with the correct frequency and station name for that area.
Autostore Control
Note: This will store up to a maximum of the 10 strongest signals available, either from the AM or the FM waveband, and overwrite the previously stored stations. You can also store stations manually in the same way as other wavebands.
- Press and hold the RADIO button.
- When the search is complete, sound is restored and the strongest signals are stored on the autostore presets.
Automatic Volume Control
When available, automatic volume control adjusts the volume level to compensate for engine noise and road speed noise.
1. Press the MENU button and select Audio Settings.
2. Select Spd. Comp. Vol.
3. Use the left or right arrow button to adjust the setting.
4. Press the OK button to confirm your selection.
5. Press the MENU button to return.
News Broadcasts
Your audio unit may interrupt normal reception to broadcast news bulletins from stations on the FM waveband, radio data system or other enhanced network linked stations.
The display will indicate there is an incoming announcement, during news broadcasts. When the audio unit interrupts for a news broadcast the preset volume level will be the same as traffic announcements.
1. Press the MENU button.
2. Select Audio Settings.
3. Scroll to News and turn on or off with the OK button.
4. Press the MENU button to return.
Alternative Frequencies
The majority of programs that broadcast on the FM waveband have a program identification code, it can be recognized by audio units.
When your vehicle moves from one transmission area to another with the alternative frequencies tuning switched on, this function will search for the strongest station signal.
Under certain conditions, alternative frequencies tuning may temporarily disrupt normal reception.
When selected, the unit continually evaluates signal strength and, if a better signal becomes available, the unit will switch to that alternative. It mutes while it checks a list of alternative frequencies and if necessary, it will search once across the selected waveband for a genuine alternative frequency.
It will restore radio reception when it finds one or if one is not found, the unit will return to the original stored frequency.
When selected, AF will be shown in the display.
1. Press the MENU button.
2. Select Audio Settings.
3. Scroll to Alternat. freq. or Alt.
Frequency. and turn on or off with the OK button.
4. Press the MENU button to return.
Regional Mode
Regional mode controls the behavior of alternative frequencies switching between regionally related networks of a parent broadcaster. A broadcaster may run a fairly large network across a large part of the country. At various times of the day this large network may be broken down into a number of smaller regional networks, typically centered on major towns or cities.
When the network is not split into regional variants, the whole network carries the same programming.
Regional mode ON: This prevents random alternative frequency switches when neighboring regional networks are not carrying the same programming.
Regional mode OFF: This allows a larger coverage area if neighboring regional networks are carrying the same programming, but can cause random alternative frequency switches if they are not.
1. Press the MENU button.
2. Select Audio Settings.
3. Scroll to RDS regional and turn on or off with the OK button.
4. Press the MENU button to return.
Audio unit - Vehicles With: Touchscreen Display
WARNING
Driving while distracted can result in loss of vehicle control, crash and injury. We strongly recommend that you use extreme caution when using any device that may take your focus off the road. Your primary responsibility is the safe operation of your vehicle. We recommend against the use of any handheld device while driving and encourage the use of voice-operated systems when possible.
Make sure you are aware of all applicable local laws that may affect the use of electronic devices while driving.
Note: The MyFord Touch system controls most of the audio features. See MyFord Touch.

- Tune: Press these buttons when in radio mode to manually search up or down through the radio frequency band. In SIRIUS mode, press these buttons to find the next or previous available satellite radio station.
- On, Off and Volume: Press the button to switch the audio system on or
off.
Turn the dial to adjust the volume.
- Eject: Press the button to eject a CD.
- SEEK Press these buttons when you are in radio mode to go to the next
station
up or down the radio frequency band, or to go to the next or previous track
on
a CD. In SIRIUS mode, press these buttons to select the next or previous
channel.
If a specific category is selected (for example Jazz, Rock or News), use these buttons to find the next or previous channel in the selected category.
- SOUND: Press the button to adjust the sound settings for bass, treble, middle, balance and fade.
- SOURCE: Press the button to access different audio modes, such as AM, FM and A/V input.
Audio unit - Vehicles With: Sony Audio System/Touchscreen Display
WARNING
Driving while distracted can result in loss of vehicle control, crash and injury. We strongly recommend that you use extreme caution when using any device that may take your focus off the road. Your primary responsibility is the safe operation of your vehicle. We recommend against the use of any handheld device while driving and encourage the use of voice-operated systems when possible.
Make sure you are aware of all applicable local laws that may affect the use of electronic devices while driving.
Note: The MyFord Touch system controls most of the audio features. See MyFord Touch.
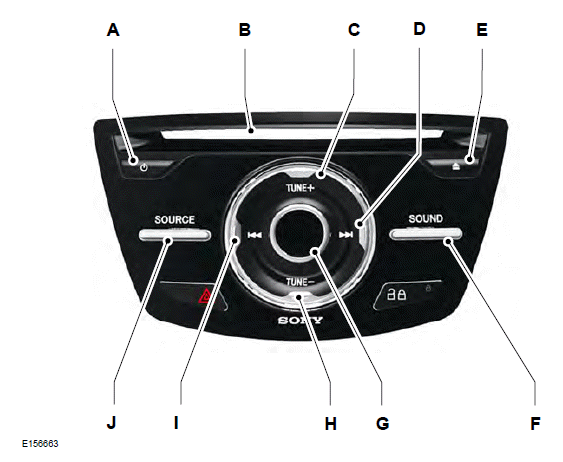
- On, Off: Press the button to switch the audio system on or off.
- CD Slot Where you insert a CD.
- TUNE +: In radio mode, press this button to manually search forward through the radio frequency band. In SIRIUS mode, press this button to find the next available satellite radio station.
- Seek up In radio mode, press this button to go to the next station up the radio frequency band. Press to go to the next track on a CD. In SIRIUS mode, press this button to select the next channel. If a specific category is selected (for example Jazz, Rock or News), use this button to find the next channel in the selected category.
- Eject: Press the button to eject a CD.
- SOUND: Press the button to adjust the sound settings for bass, treble, middle, balance and fade.
- Volume Turn the dial to adjust the volume.
- TUNE -: In radio mode, press this button to manually search backward through the radio frequency band. In SIRIUS mode, press this button to find the previous available satellite radio station.
- Seek down In radio mode, press this button to go to the next station down the radio frequency band. Press to go to the previous track on a CD. In SIRIUS mode, press this button to select the previous channel. If a specific category is selected (for example Jazz, Rock or News), use this button to find the previous channel in the selected category.
- SOURCE: Press the button to access different audio modes, such as AM, FM and A/V input.
Auxiliary Input Jack
WARNINGS
Driving while distracted can result in loss of vehicle control, crash and injury. We strongly recommend that you use extreme caution when using any device that may take your focus off the road. Your primary responsibility is the safe operation of your vehicle. We recommend against the use of any hand-held device while driving and encourage the use of voice-operated systems when possible.
Make sure you are aware of all applicable local laws that may affect the use of electronic devices while driving.
For safety reasons, do not connect or adjust the settings on your portable music player while your vehicle is moving.
Store the portable music player in a secure location, such as the center console or the glove box, when your vehicle is moving. Hard objects may become projectiles in a collision or sudden stop, which may increase the risk of serious injury. The audio extension cable must be long enough to allow the portable music player to be safely stored while your vehicle is moving.
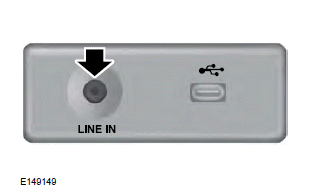
The auxiliary input jack allows you to connect and play music from your portable music player through your vehicle speakers.
You can use any portable music player designed for use with headphones. Your audio extension cable must have male 1/8th-inch (3.5 millimeter) connectors at each end.
1. Switch off the engine, radio and portable music player. Set the parking brake and put the transmission in position P (vehicle with an automatic transmission) or neutral (vehicle with a manual transmission).
2. Plug the extension cable from the portable music player into the auxiliary input jack.
3. Switch the radio on. Select either a tuned FM station or a CD.
4. Adjust the volume as desired.
5. Switch your portable music player on and adjust its volume to half its maximum level.
6. Press AUX until LINE or LINE IN appears in the display. You should hear music from your device even if it is low.
7. Adjust the volume on your portable music player until it reaches the volume level of the FM station or CD. Do this by switching back and forth between the AUX and FM or CD controls.
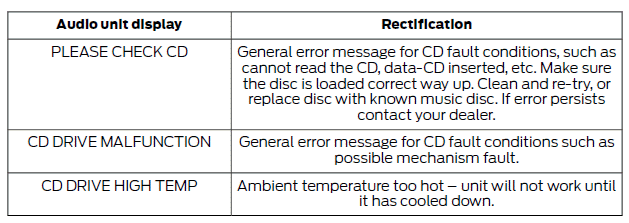
Audio Troubleshooting


Other info:
Skoda Fabia. Sealing and inflating the tyre
Sealing
Shake the tyre inflator bottle 10 » Fig. 145 on page 162 vigorously
several
times.
Firmly screw the inflation hose 3 onto the tyre inflator bottle 10 in a
clockwise
direction. ...
Nissan Micra. Fuel gauge
The gauge indicates A the approximate fuel
level in the tank when the ignition switch is placed
in the ON position.
When one segment remains on the digital fuel
gauge, only one segment will ...
Nissan Micra. USB (Universal Serial Bus) connection port
(if so equipped)
Connecting a device to the USB connection port
WARNING
Do not connect, disconnect, or operate the
USB device while driving. Doing so can be
a distraction. If distracted you could ...
Manuals For Car Models
-
 Chevrolet Sonic
 -
 Citroen C3
 -
 Fiat Punto
 -
 Honda Fit
 -
 Mazda 2
 -
 Nissan Micra
 -
 Peugeot 208
 -
 Renault Clio
 -
 Seat Ibiza
 -
 Skoda Fabia
 - Honda Pilot
- Volkswagen ID4
- Toyota Prius