Fiat Punto: Control buttons
Fiat Punto Owners Manual
To use the information the “Digital display”, “Multifunction display” and “Reconfigurable multifunction display” are able to give (with the ignition key at MAR), you should firstly familiarise with the control buttons on the right and left side of the instrument panel and on the top of the right stalk (for the “Trip computer” function) (where provided) using them as described below.
Before doing anything you are also advised to read this chapter thoroughly.
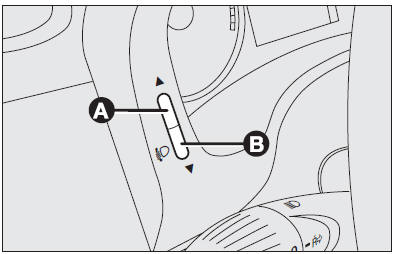
Headlight beam adjusting device
The left-hand side of the instrument panel features two buttons (A and B) for adjusting the headlight beam according to the transported load.
Buttons can be operated with ignition key at MAR and dipped beam headlights on. See paragraph "Headlights" in this section for further details.
Digital display (where provided)
Trip button
To show on the display: total and trip km/miles.
Press briefly: to switch between total and trip km/miles.
Press for over 2 seconds: to reset trip km/miles.
h button
Set clock.
Multifunction display (where provided) +/– button
Button +: set clock (to increase minutes) Button – : set clock ( to decrease minutes)
Reconfigurable multifunction display (where provided)
+/– buttons
To scroll the menu and the related options upwards/downwards or to increase/decrease the value displayed, to adjust, with sidelights turned on, the dimmer and the instrument panel and automatic two-zone climate control system (where provided) display/index (if pressed with “Set-up menu” off).
MODE button
Press for less than 2 seconds (pulse) indicated with
 in the following
diagrams, to confirm the option required and/or move to the main menu
(same option), or access the menu.
Press for over 2 seconds, indicated with
 in the following diagrams, to
exit the set-up menu without confirming the selections being set.
TRIP button (for multifunction display and reconfigurable multifunction display)
Press for less than 1 second (pulse) indicated with
 in the following
diagrams, to scroll the Trip computer display.
Press for more than 2 seconds indicated with
 in the following
diagrams, to reset the Trip computer and start a new mission.


Other info:
Ford Fiesta. Driving Hints
Breaking-In
Tires
WARNING
New tires need to be run-in for
approximately 300 miles (500
kilometers). During this time, you
may experience different driving
characteristics.
Brakes and Clutch
WARNING
Av ...
Ford Fiesta. Transmission
Manual Transmission
Using the Clutch
Note: Failure to fully depress the clutch
pedal to the floor may cause increased shift
efforts, prematurely wear transmission
components or damage the transmission ...
Renault Clio. Parking sensor
Operating principle
Ultrasonic detectors, installed in the
rear bumper (depending on the vehicle),
measure the distance between the
vehicle and an obstacle whilst reversing.
This measurement is ...
Manuals For Car Models
-
 Chevrolet Sonic
 -
 Citroen C3
 -
 Fiat Punto
 -
 Honda Fit
 -
 Mazda 2
 -
 Nissan Micra
 -
 Peugeot 208
 -
 Renault Clio
 -
 Seat Ibiza
 -
 Skoda Fabia
 - Honda Pilot
- Volkswagen ID4
- Toyota Prius