Mazda 2: Audio Set (Type C/Type D)
Mazda2 Owners Manual
NOTE
The explanation of functions described in this manual may differ from the actual operation, and the shapes of screens and buttons and the letters and characters displayed may also differ from the actual appearance.
Additionally, depending on future software updates, the content may successively change without notice.
Audio Set (Type C/Type D) has three different human interfaces.
- Commander switch
- Touch panel
- Voice recognition with steering switch and microphone
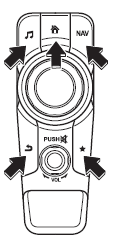
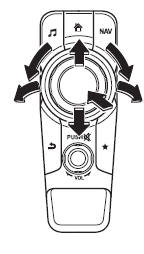
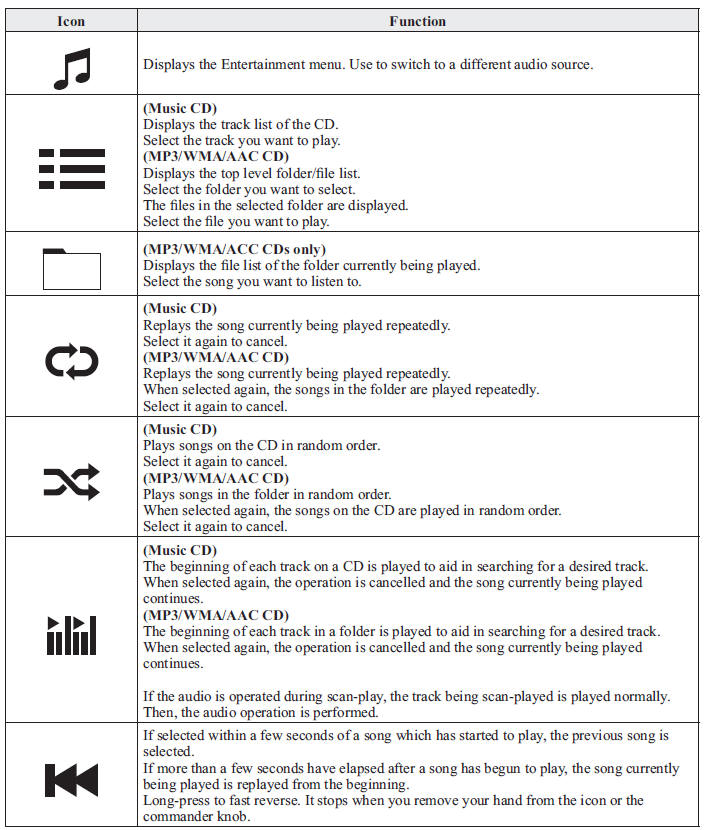
Commander switch operation
NOTE
For safety reasons, some operations are disabled while the vehicle is being driven.
Volume dial operation
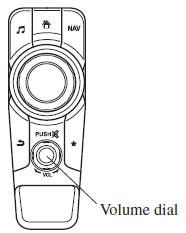 Press the volume dial to switch
the audio MUTE on and off.
Turn the volume dial to adjust the volume. The volume increases by turning the dial clockwise, and decreases by turning it anticlockwise.
Switches around commander knob
 The following operations can be
done by pressing the switches around the commander knob.
 Displays the home screen.
 Displays the Entertainment
screen.
 Displays the Navigation screen
(Only navigation-equipped vehicles). For operation
of the Navigation screen, refer to the navigation system manual. If the SD card
for the
navigation system is not inserted, the compass indicating the direction in which
the vehicle
is moving is displayed.
 Displays the Favourites screen.
Long-press to store particular items in Favourites.
(Radio, phonebook and destination of the navigation system can be programmed.)
 Returns to previous screen.
Commander knob operation
 (Selection of icons on screen)
- Tilt or turn the commander knob and move the cursor to the desired icon.
- Press the commander knob and select the icon.
NOTE
Long-press operation of the commander knob is also possible for some functions.
Touch panel operation
CAUTION
Do not press the screen strongly or press it with a sharp-pointed object. Otherwise, the screen could be damaged.
NOTE
For safety reasons, touch panel operation is disabled while the vehicle is moving.
Basic Operation Method
TOUCH & TAP
- Touch or tap on the item indicated on the screen.
- The operation is launched and the next item is displayed.
SLIDE
- Touch the setting item displaying a slider bar.
- Touch the slider with your fi nger and move to the desired level.
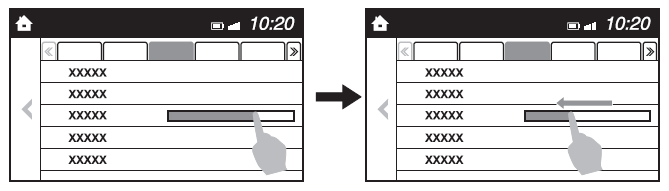
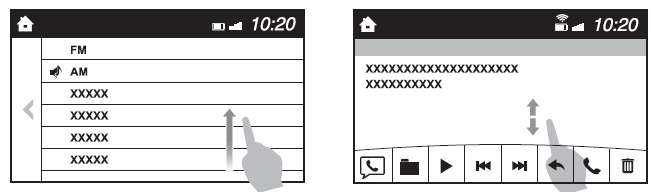
SWIPE
- Touch the screen with your fi nger and move up or down.
- Items which were not displayed can be displayed.
Return to previous screen
- Touch the

Displaying the home screen
- Touch the

Home screen
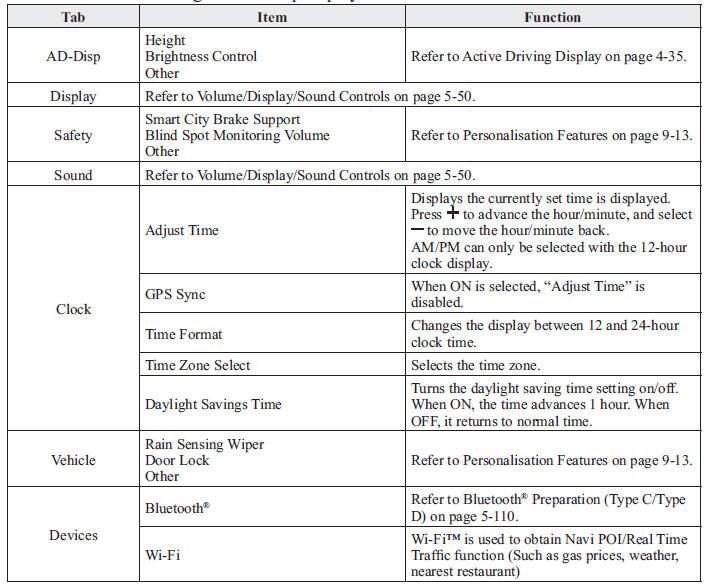
Volume/Display/Sound Controls

Volume adjustment
Turn the commander switch volume dial.
The volume switch on the steering switch can also be pressed.
Display setting
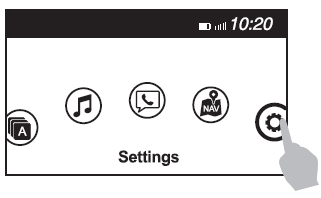
Select the  icon on the home
screen and
display the Settings screen.
Select the tab to select the item you would like to change.
Display OFF/Clock
The centre display can be turned off.
Select  to turn the display off.
When is 
selected the centre display turns off and
the clock is displayed.
The centre display can be turned back on as follows:
- Touch the centre display.
- Operate the commander switch.
Daytime/nighttime (Mode) screen setting
The daytime or nighttime screen can be selected.
 : Switches screen automatically
according to headlight illumination
condition*1
 : Daytime screen setting
 : Nighttime screen setting
*1 The display is constantly on daytime screen when the illumination dimmer is cancelled.
Brightness adjustment
Adjust the centre display brightness using the slider.
Contrast adjustment
Adjust the centre display contrast using the slider.
Display setting reset
All of the screen setting values can be reset to their initial settings.
- Select
 .
. - Select
 .
.
Audio sound adjustment
Select the  icon on the home
screen and
display the Settings screen.
Select the  tab to select the item
you
would like to change. 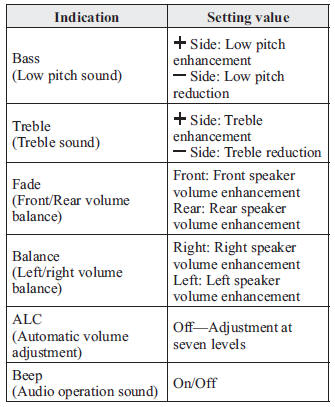
ALC (Automatic volume adjustment)
The automatic level control (ALC) is a feature that automatically adjusts audio volume and sound quality according to the vehicle speed. The volume increases in accordance with the increase in vehicle speed, and decreases as vehicle speed decreases.
Operating the Radio (Type C)
Radio ON
Select the  icon on the home
screen and display the Entertainment screen. When selecting
the desired radio, the following icons are indicated in the lower part of the
centre display.
AM/FM Radio
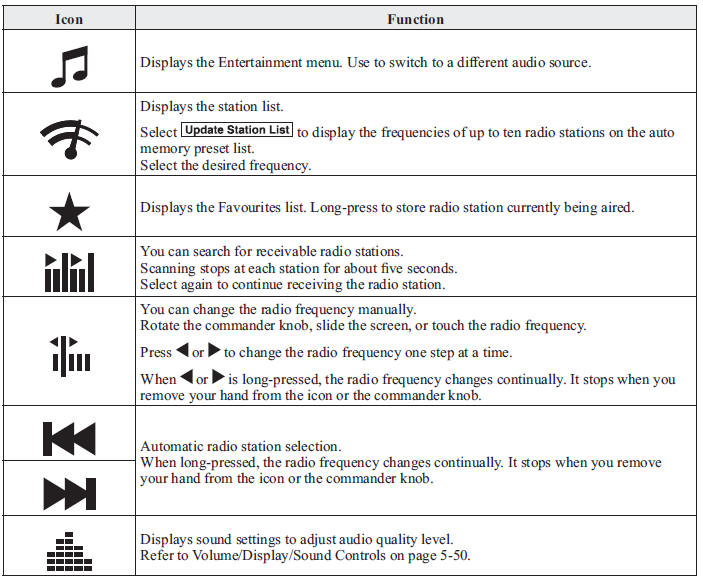
Favourites Radio
Selected stations can be registered for convenient operation. Up to 50 stations can be registered. The Favourites list is common to AM and FM radio.
Registering to Favourites
Long-press the icon to
register the
current radio station. The registration can
also be performed using the following
procedure.
- Select the
 icon to display
the Favourites list. - Select
 .
. - Select
 .
. - The station is added to the bottom of the Favourites list.
NOTE
If the battery is disconnected, your Favourites list will be not deleted.
Selecting radio station from Favourites
- Select the
 icon to display
the Favourites list. - Select the radio station name or radio frequency to tune in the radio station.
Deleting from Favourites
- Select the
 icon to display
the Favourites list. - Select
 .
. - Select

- Select the radio station or radio frequency you want to delete.
- Select
 .
.
Changing Favourites list order
- Select the
 icon to display
the Favourites list. - Select

- Select

- Select a radio station or radio frequency. The selected radio station can be moved.
- Slide the radio station or move it using
the commander switch, then select
 .
.
Operating the Radio (Type D)
Radio ON
Select the  icon on the home
screen and display the Entertainment screen. When selecting
the desired radio, the following icons are indicated in the lower part of the
centre display.
AM/FM Radio

NOTE
When the  or
or
 icon is selected while
FM is selected, each programme is
selected.
Favourites Radio
Selected stations can be registered for convenient operation. Up to 50 stations can be registered. The Favourites list is common to AM, FM and DAB radio.
Registering to Favourites
Long-press the  icon to register
the
current radio station. The registration can
also be performed using the following
procedure.
- Select the
 icon to display
the Favourites list. - Select
- Select
- The station is added to the bottom of the Favourites list.
NOTE
If the battery is disconnected, your Favourites list will be not deleted.
Selecting radio station from Favourites
- Select the
 icon to display
the Favourites list. - Select the radio station name or radio frequency to tune in the radio station.
Deleting from Favourites
- Select the
 icon to display
the Favourites list. - Select

- Select

- Select the radio station or radio frequency you want to delete.
- Select

Changing Favourites list order
- Select the
 icon to display
the Favourites list. - Select

- Select

- Select a radio station or radio frequency. The selected radio station can be moved.
- Slide the radio station or move it using
the commander switch, then select

Radio Data System (RDS)
Alternative frequency (AF)
AF functions on FM stations. Turn on the AF mode. If the radio reception of the current station weakens, the system switches to an alternative station automatically.
If you wish to continue a regional programme, turn on the Region lock (REG) mode.
AF/REG on or off switching
Select the  icon while in FM mode
to
switch to the FM settings screen. AF/REG
on or off switching can be performed as
follows:
(AF mode on/off)
Select On/Off on the FM settings screen.
(REG mode on/off) While the AF mode is on, select On/Off.
Traffi c announcement (TA)
Select  during FM/AM reception to
switch to the TA mode.
If a TA broadcast is received while in the TA mode, the TA broadcast intercedes even while using other functions (FM, CD, USB, AUX, BT audio, Aha™ radio, or Stitcher™ radio), and “Traffi c Announcement” is displayed.
If a TA is received on the Entertainment
screen,  is displayed on the
screen.
Select  to cancel the received
TA and
return to TA reception stand-by. If a TA is
received on a screen other than the
Entertainment screen, the selection screens
for  ,
,
 , and
, and
 are displayed
on the screen. If  is
is
selected, the
selection screen turns off when a TA is
received while continuing to receive TAs.
Selection from Station List
List of receivable RDS radio stations is displayed. You can easily select the station you want to listen to from the list. If a radio station name is not available, the frequency is displayed. In addition, radio stations which have been programmed to a Genre code (Programme types like Rock, News, and so on) can also be displayed separately by category.
NOTE
It may take longer to display the station list depending on the reception conditions.
- Select the
 icon to display
the radio station list. - Select the radio station name or radio frequency to tune in the radio station.
(Selecting Genre)
- Select the
 on the
station list screen to display the genre list screen. - Select the genre to display the radio station list in the genre.
NOTE
Only one Genre can be selected.
Operating the Digital Audio Broadcasting (DAB) Radio (Type D)
What is DAB radio?
DAB radio is a digital broadcasting system for radio.
DAB radio provides a high-quality radio sound source using an auto frequency switching function in boundary areas.
By displaying the radio text, information such as the song name and artist name can be displayed.
Radio ON
- Select
 on the home screen
and display the Entertainment screen. - Select
 , the following
icons are displayed at the bottom of the screen.
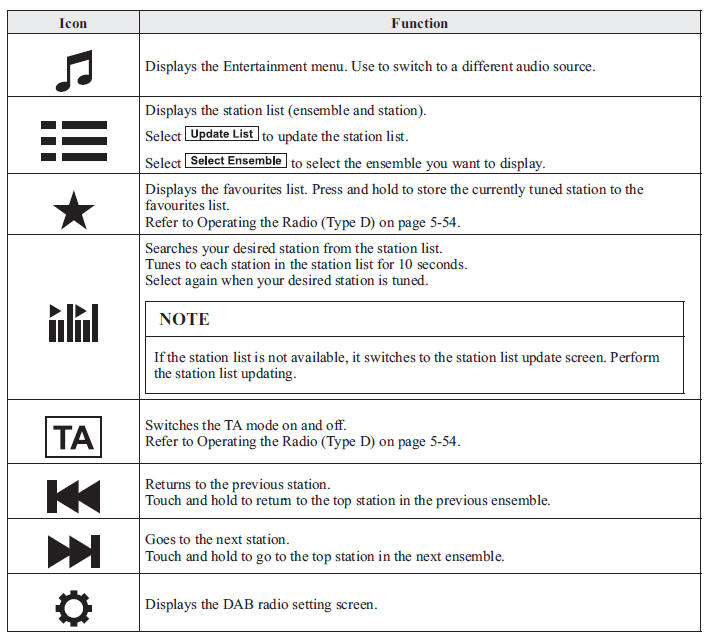

Example of use (Update station list and listen to DAB radio)
- Select the
 icon and display
the following screen.
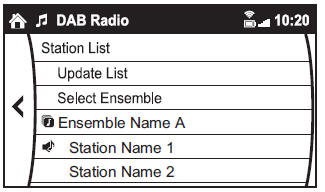
- Select
 to update the
station list. - Select
 to select the
ensemble you want to display. - Select a desired station to start radio reception.
DAB radio setting
- Select the
 icon while
using DAB radio. - Select the desired item and perform the
setting.
The items which can be set are as follows:
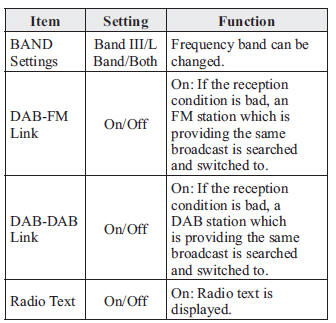
NOTE
- The radio text may not be displayed depending on the radio station.
- The radio text cannot be displayed in DAB-FM mode.
- If there is no DAB radio signal, “Signal Lost” is displayed on the screen. Change the ensemble or radio station, or perform station list updating.
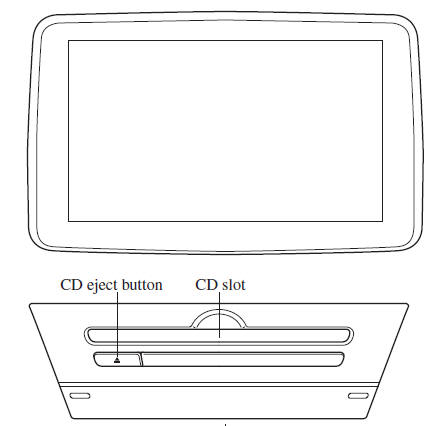
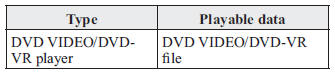
Operating the Compact Disc (CD) Player *
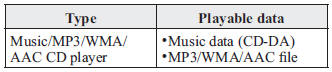
NOTE
If a disc has both music data (CDDA) and MP3/WMA/AAC fi les, playback of the two or three fi le types differs depending on how the disc was recorded.
Inserting the CD
Insert the CD into the slot, label-side up.
The auto-loading mechanism will set the CD and begin play.
NOTE
There will be a short lapse before play begins while the player reads the digital signals on the CD.
Ejecting the CD
Press the CD eject button (  ) to
) to
eject the
CD.
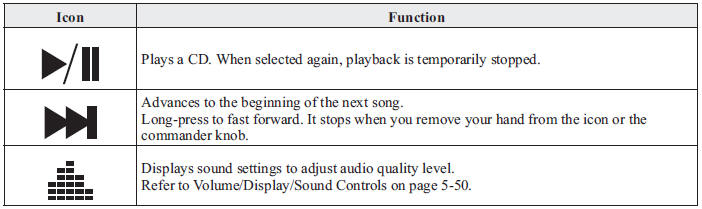
Playback
Select the  icon on the
home screen with a CD inserted and display the Entertainment
screen. When  is selected, the
following icons are indicated in the lower part of the centre
display.
Example of use (When searching for a song from the top level of an MP3/ WMA/AAC CD)
- Select the
 icon and display
the folder/fi le list at the top level.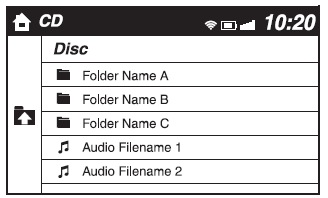
- When the folder is selected, folders/fi le lists in the folder are displayed.
- Select the desired song.
NOTE
- Select
 to move to a
folder one level higher. - The appearance of the repeat and shuffl e icons changes depending on the type of operation in which the function is used.
Operating the Digital Versatile Disc (DVD) Player *
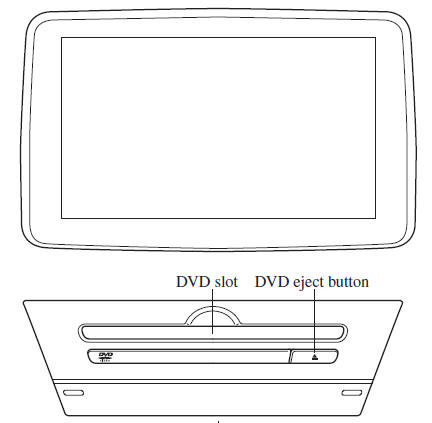
 Inserting the DVD
Insert the DVD into the slot, label-side up.
The DVD is inserted automatically and the top menu screen of the DVD disc and controller are displayed.
NOTE
There will be a short lapse before play begins while the player reads the digital signals on the DVD.
Ejecting the DVD
Press the DVD eject button (  )
)
to eject the
DVD.
Playback
Select the  icon on the home
screen with a DVD inserted and display the Entertainment
screen. When  is selected, the DVD
top menu screen and the controller are displayed.
When starting the playback by operating the controller, the following icons are displayed at the bottom of the screen.
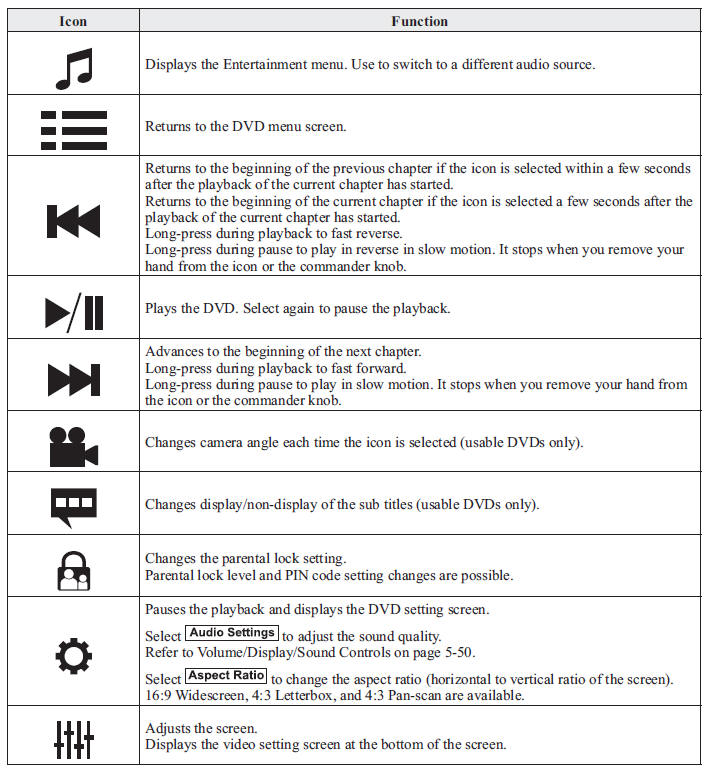
NOTE
- For safety reasons, images are not displayed while the vehicle is being driven.
- Slide the
 of the
controller to move the controller. - If the mode is switched to DVD mode once the DVD playback has stopped, the playback restarts without displaying the DVD menu screen.
Setting DVD functions
Sound quality and aspect ratio settings can be performed.
Setting sound quality
- Select the
 icon.
icon. - Select
 to adjust the
sound quality.
Refer to Volume/Display/Sound Controls on page 5-50 .
Setting aspect ratio
- Select the
 icon.
icon. - Select
 .
. - Select a desired aspect ratio.
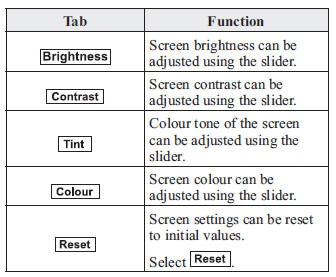
Setting image quality
Brightness, contrast, tint, colour density can be adjusted.
When the  icon is selected,
the
following tabs are displayed at the bottom
of the screen.
How to use Auxiliary jack/USB port
Audio can be heard from the vehicle's speakers by connecting a commerciallyavailable portable audio unit to the auxiliary jack.
Use a commercially-available, nonimpedance
(3.5  ) stereo mini plug lead.
In addition, audio can be played from the vehicle audio device by connecting a USB device or an iPod to the USB port.
Refer to AUX/USB/iPod mode on page 5-71 .
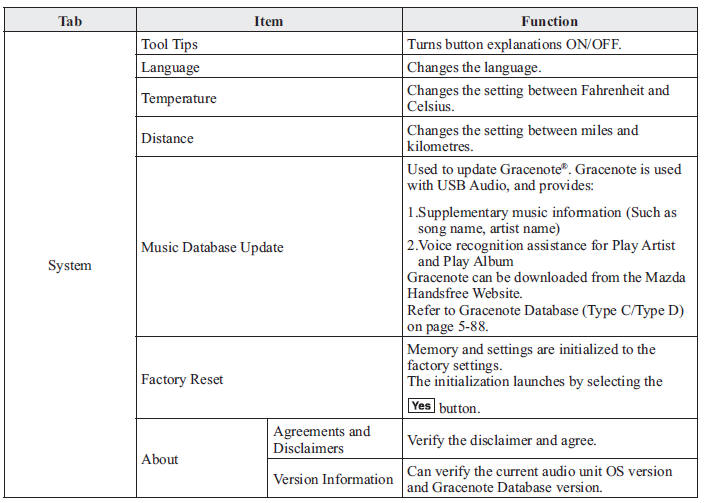
Settings
NOTE
Depending on the grade and specifi cation, the screen display may differ.
Select the icon on the home
screen and display the Settings screen.
Switch the tab and select the setting item you want to change.
You can customize settings in the setup display as follows:
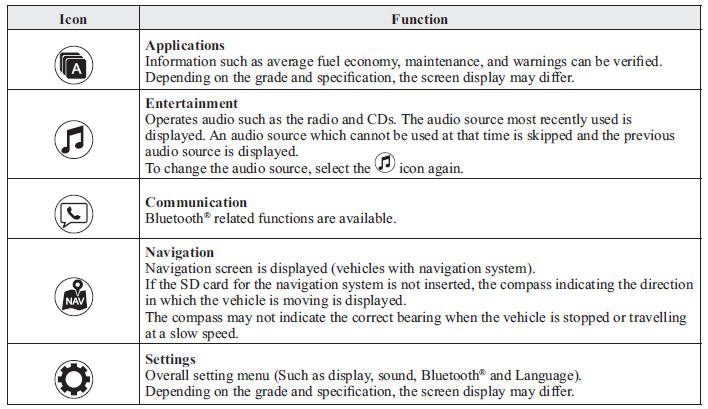
Applications
NOTE
Depending on the grade and specifi cation, the screen display may differ.
Select the  icon on the home
screen to
display the Applications screen. The
following information can be verifi ed.


Other info:
Renault Clio. Seat belts
Always wear your seat belt when travelling
in your vehicle. You must also
comply with the legislation of the particular
country you are in.
Make sure that the rear bench seat
is locked i ...
Mazda 2. Specifications
Engine
Petrol engine
Arab Gulf Cooperation Council
Diesel engine
Electrical System
Battery
*1 N-55 (S), Q-85 or S-95 is designed for i-stop system (FOR STOP &
START)/i-ELOOP ...
Nissan Micra. Break-in schedule
CAUTION
During the first 2,000 km (1,200 miles),
follow these recommendations to obtain
maximum engine performance and ensure
the future reliability and economy of your
new vehic ...
Manuals For Car Models
-
 Chevrolet Sonic
 -
 Citroen C3
 -
 Fiat Punto
 -
 Honda Fit
 -
 Mazda 2
 -
 Nissan Micra
 -
 Peugeot 208
 -
 Renault Clio
 -
 Seat Ibiza
 -
 Skoda Fabia
 - Honda Pilot
- Volkswagen ID4
- Toyota Prius