Mazda 2: Light Bulbs
Mazda2 Owners Manual
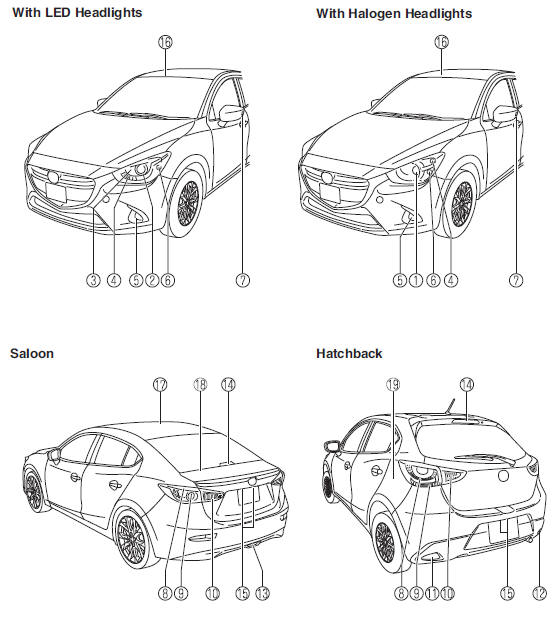
- Headlights (Low/High beam)
- Headlights (Low beam)
- Headlights (High beam)
- Running lights * /Position lights
- Front fog lights *
- Front direction indicator lights
- Side direction indicator lights
- Brake lights/Tail lights
- Rear direction indicator lights
- Reverse lights
- Rear fog light (Left-hand drive model) *
- Rear fog light (Right-hand drive model) *
- Rear fog light *
- High-mount brake light
- Number plate lights
- Overhead lights (Front)/Map lights *
- Overhead lights (Rear) *
- Boot light (Saloon)
- Luggage compartment light (Hatchback)
WARNING
Never touch the glass portion of a halogen bulb with your bare hands and always wear eye protection when handling or working around the bulbs: When a halogen bulb breaks, it is dangerous. These bulbs contain pressurised gas. If one is broken, it will explode and serious injuries could be caused by the fl ying glass.
If the glass portion is touched with bare hands, body oil could cause the bulb to overheat and explode when lit.
Always keep halogen bulbs out of the reach of children: Playing with a halogen bulb is dangerous. Serious injuries could be caused by dropping a halogen bulb or breaking it some other way.
NOTE
- To replace the bulb, contact an expert repairer, we recommend an Authorised Mazda Repairer.
- If the halogen bulb is accidentally touched, it should be cleaned with rubbing alcohol before being used.
- Use the protective cover and carton for the replacement bulb to dispose of the old bulb promptly and out of the reach of children.
Replacing Exterior Light Bulbs
Headlights (With LED headlights)
The LED bulb cannot be replaced as a single unit because it is an integrated unit.
The LED bulb has to be replaced with the unit. We recommend an Authorised Mazda Repairer when the replacement is necessary.
Headlights (With halogen headlights)
- If you are changing the right bulb, start
the engine, turn the steering wheel all
the way to the left, and turn off engine.
If you are changing the left bulb, turn the steering wheel to the right, and turn off engine.
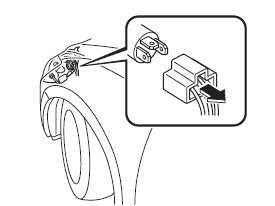
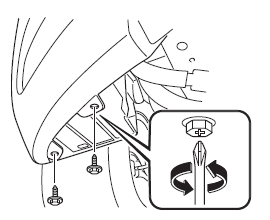
- Make sure the headlight switch is off.
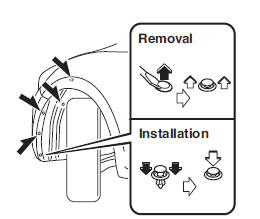
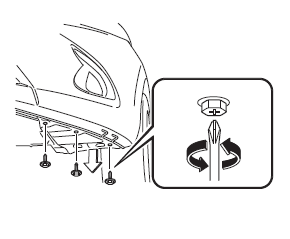
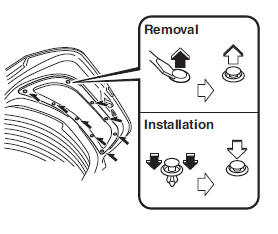
- Pull the centre of each plastic retainer and remove the retainers.
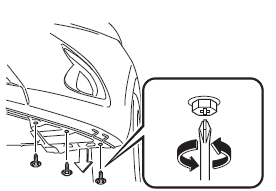
- Turn the screw anticlockwise and remove it, and then partially peel back the mudguard.
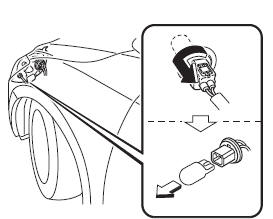
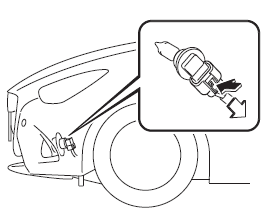
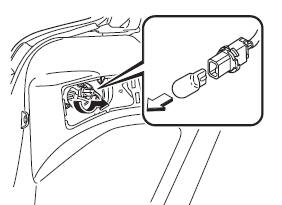
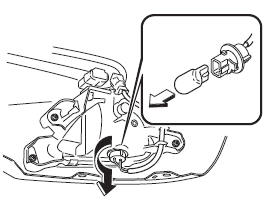
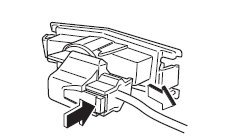
- Disconnect the connector from the bulb.
- Detach the sealing cover from the bulb.
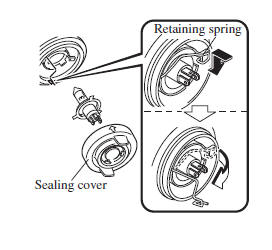
- Unhook the bulb retaining spring.
- Swing the retaining spring out and away to free the headlight bulb.
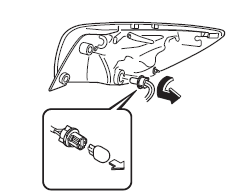
- Carefully remove the headlight bulb from the socket by pulling it straight back.
- Replace the bulb.
- Install the new bulb in the reverse order of the removal procedure.
NOTE
- To replace the bulb, contact an expert repairer, we recommend an Authorised Mazda Repairer.
- If the halogen bulb is accidentally touched, it should be cleaned with rubbing alcohol before being used.
- Use the protective cover and carton of the replacement bulb to dispose of the old bulb promptly out of the reach of children.
- When reinstalling the sealing cover, make sure it is fi tted correctly.
Running lights/Position lights (With LED headlights)
The LED bulb cannot be replaced as a single unit because it is an integrated unit.
The LED bulb has to be replaced with the unit. We recommend an Authorised Mazda Repairer when the replacement is necessary.
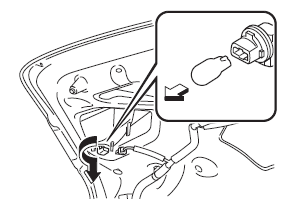
Front direction indicator lights, Running lights * /Position lights (With halogen headlights)
- If you are changing the right bulb, start
the engine, turn the steering wheel all
the way to the left, and turn off engine.
If you are changing the left bulb, turn the steering wheel to the right, and turn off engine.
- Make sure the headlight switch is off.
- Pull the centre of each plastic retainer and remove the retainers.
- Turn the screw anticlockwise and remove it, and then partially peel back the mudguard.
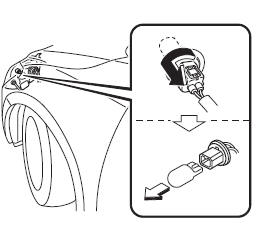
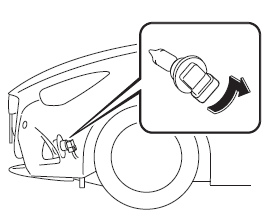
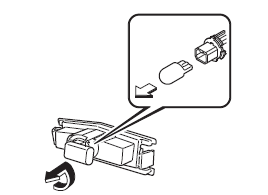
- Turn the socket and bulb assembly anticlockwise and remove it.
- Disconnect the bulb from the socket.
Front direction indicator lights
Running lights/Position lights (With halogen headlights)*
Position lights (With halogen headlights)*
- Install the new bulb in the reverse order of the removal procedure.
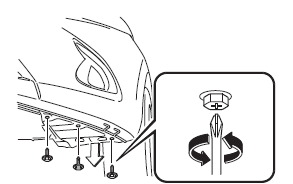
Front fog lights *
- Make sure the ignition is switched off, and the fog light switch is off.
- Turn the screw anticlockwise and remove it, and then partially peel back the mudguard.
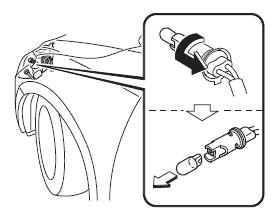
- Disconnect the connector from the unit by pressing the tab on the connector with your fi nger and pulling the connector downward.
- Turn the socket and bulb assembly to remove it. Carefully remove the bulb from its socket in the refl ector by gently pulling it straight backward out of the socket.
- Install the new bulb in the reverse order of the removal procedure.
Side direction indicator lights, Highmount brake light
The LED bulb cannot be replaced as a single unit because it is an integrated unit.
The LED bulb has to be replaced with the unit. We recommend an Authorised Mazda Repairer when the replacement is necessary.
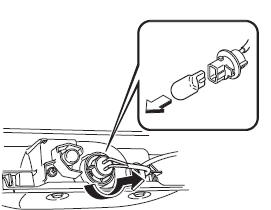
Rear direction indicator lights, Brake lights/Tail lights
Saloon
- Make sure the ignition is switched off, and the headlight switch is off.
- Remove the cover.
- Turn the socket and bulb assembly anticlockwise and remove it.
- Disconnect the bulb from the socket.
Rear direction indicator lights
Brake lights/Tail lights
- Install the new bulb in the reverse order of the removal procedure.
- Insert the cover tabs and install the cover.
NOTE
Verify that the cover is securely installed.
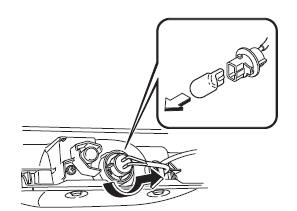
Hatchback
- Make sure the ignition is switched off, and the headlight switch is off.
- Turn the bolts anticlockwise and remove them.
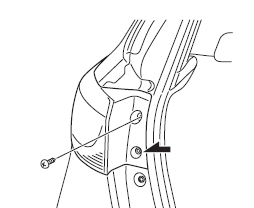
- Pull the unit rearward to remove it.
- Turn the socket and bulb assembly anticlockwise and remove it.
- Disconnect the bulb from the socket.
Rear direction indicator lights
Brake lights/Tail lights (LED type)
The LED bulb cannot be replaced as a single unit because it is an integrated unit.
The LED bulb has to be replaced with the unit. We recommend an Authorised Mazda Repairer when the replacement is necessary.
(Bulb type)
- Install the new bulb in the reverse order of the removal procedure.
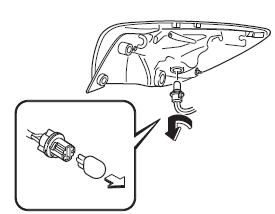
Reverse lights
Saloon
- Make sure the ignition is switched off, and the headlight switch is off.
- Pull the centre of each plastic retainer and remove the retainers.
- Peel back the boot lid trim.
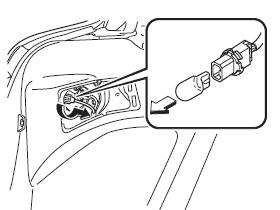
- Disconnect the electrical connector from the bulb by pressing the tab on the connector with your fi nger and pulling the connector.
- Turn the socket and bulb assembly anticlockwise and remove it.
- Disconnect the bulb from the socket.
- Install the new bulb in the reverse order of the removal procedure.
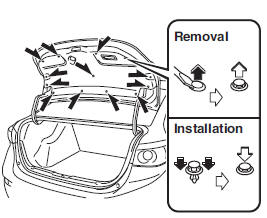
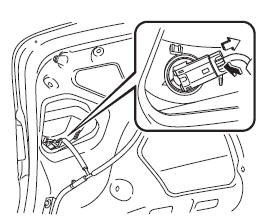
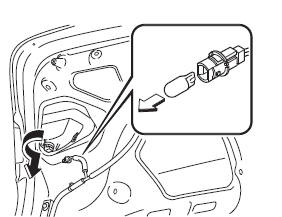
Hatchback
- Make sure the ignition is switched off, and the headlight switch is off.
- Pull the centre of each plastic retainer and remove the retainers.
- Remove the cover on the interior surface of the liftgate.
- Disconnect the connector from the socket.

- Turn the socket and bulb assembly anticlockwise and remove it.
- Disconnect the bulb from the socket.
- Install the new bulb in the reverse order of the removal procedure.
Rear fog light *
Saloon
- Make sure the ignition is switched off, and the headlight switch is off.
- Turn the socket and bulb assembly anticlockwise and remove it.
- Disconnect the bulb from the socket.
- Install the new bulb in the reverse order of the removal procedure.
Rear fog light *
Saloon
- Make sure the ignition is switched off, and the headlight switch is off.
- Turn the socket and bulb assembly anticlockwise and remove it.
- Disconnect the bulb from the socket.
- Install the new bulb in the reverse order of the removal procedure.
Hatchback
- Make sure the ignition is switched off and the headlight switch is off
- Turn the screw anticlockwise and remove it, and then partially peel back the mudguard.
- Turn the socket and bulb assembly anticlockwise and remove it.
- Disconnect the bulb from the socket.
- Install the new bulb in the reverse order of the removal procedure.
Number plate lights
Saloon
- Make sure the ignition is switched off, and the headlight switch is off.
- Pull the centre of each plastic retainer and remove the retainers.
- Peel back the boot lid trim.
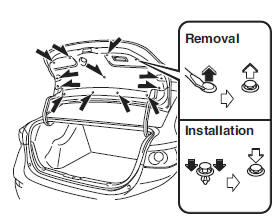
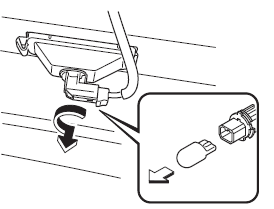
- Turn the socket and bulb assembly anticlockwise and remove it.
- Disconnect the bulb from the socket.
- Install the new bulb in the reverse order of the removal procedure.
Hatchback
- Make sure the ignition is switched off, and the headlight switch is off.
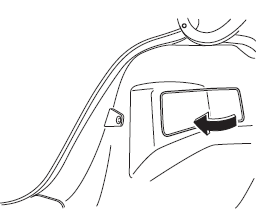
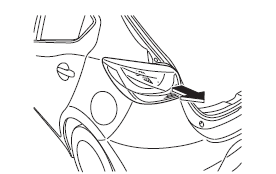
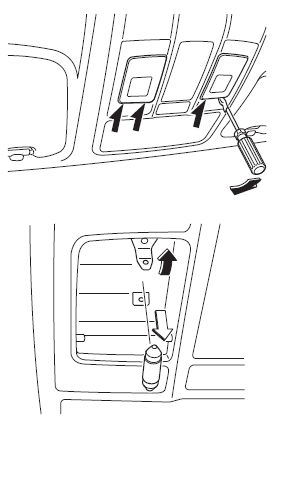
- Wrap a fl athead screwdriver with a soft cloth to prevent damage to the light unit.
- Insert a fl athead screwdriver into the position shown in the fi gure and pull the light unit outward.
- Disconnect the electrical connector from the bulb by pressing the tab on the connector with your fi nger and pulling the connector.
- Turn the socket and bulb assembly anticlockwise and remove it.
- Disconnect the bulb from the socket.
- Install the new bulb in the reverse order of the removal procedure.
Replacing Interior Light Bulbs
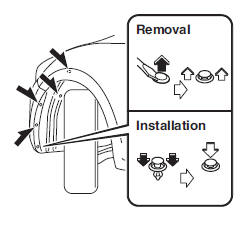
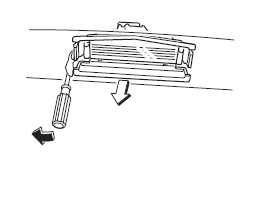
Overhead lights/Map lights * , Overhead lights (Front) * , Overhead lights (Rear)
- Wrap a small fl athead screwdriver with a soft cloth to prevent damage to the lens, and then remove the lens by carefully prying on the edge of the lens with the fl athead screwdriver.
- Disconnect the bulb by pulling it out.
Overhead lights/Map lights *
Overhead lights (Front) *
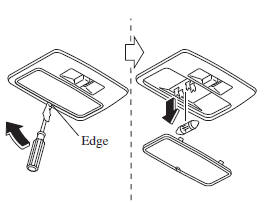
Overhead lights (Rear) *
- Install the new bulb in the reverse order of the removal procedure.
Boot light (Saloon)
- Press both sides of the lens cap to remove it
- Disconnect the bulb by pulling it out.
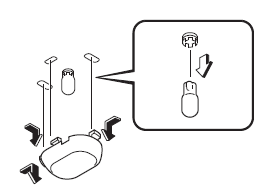
- Install the new bulb in the reverse order of the removal procedure.
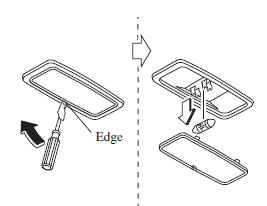
Luggage compartment light (Hatchback)
- Wrap a small fl athead screwdriver with a soft cloth to prevent damage to the lens and remove the lens by carefully prying on the edge of the lens with the fl athead screwdriver
- Disconnect the bulb by pulling it out.

- Install the new bulb in the reverse order of the removal procedure.


Other info:
Fiat Punto. Checking fluid levels
IMPORTANT When topping up
take care not to confuse the
various types of fluids: they are
all incompatible with one
another and could seriously
damage the car.
1.28V version
IMPORTANT Never ...
Chevrolet Sonic. Securing Child Restraints (Rear Seat)
When securing a child restraint in a rear seating position, study the instructions
that came with the child restraint to make sure it is compatible with this vehicle.
If the child restraint has the ...
Nissan Micra. How to park with predicted course lines
WARNING
If the tires are replaced with different
sized tires, the predicted course lines
may be displayed incorrectly.
On a snow-covered or slippery road,
there may be a dif ...
Manuals For Car Models
-
 Chevrolet Sonic
 -
 Citroen C3
 -
 Fiat Punto
 -
 Honda Fit
 -
 Mazda 2
 -
 Nissan Micra
 -
 Peugeot 208
 -
 Renault Clio
 -
 Seat Ibiza
 -
 Skoda Fabia
 - Honda Pilot
- Volkswagen ID4
- Toyota Prius