
Seat Ibiza: Fuses
Seat Ibiza Owners Manual
Changing a fuse
If a fuse has blown it must be replaced
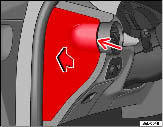
Fig. 146 Fuses in the dash panel
fuse cover
– Switch off the ignition and the component concerned. – Identify the fuse for the failed component. – Take the plastic clip from inside the fuse cover, fit it onto the blown fuse and pull the fuse out.
– Replace the blown fuse (which will have a melted metal strip) with a new fuse of the same ampere rating. The individual electrical circuits are protected by fuses. The fuses are located behind a cover at the left-hand end of the dash panel. In versions with the steering wheel on the right the fuses are on the right-hand side of the instrument panel, behind a cover. The electric windows are protected by circuit breakers. These reset automatically after a few seconds when the overload (caused for example by frozen windows) has been corrected.
Colour coding of fuses

WARNING
Never “repair” damaged fuses and never replace them with fuses with a higher rating. Failure to comply could result in fire. This could also cause damage to other parts of the electrical system.

Note
•If a newly replaced fuse blows again after a short time, the electrical system must be checked by a qualified workshop as soon as possible.
• If you replace a fuse with a stronger fuse, you could cause damage to another location in the electrical system.
• Always keep some spare fuses in the vehicle. These are available from SEAT dealers.
Fuses on left side of dash panel
Fuses
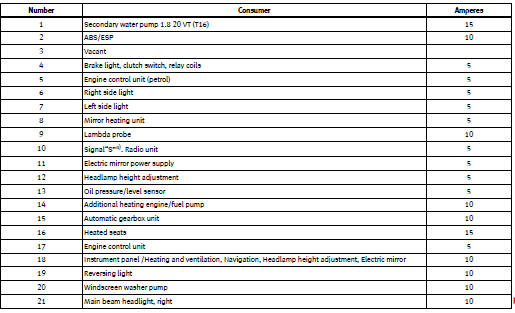
a) The signal “S”is a system which includes the starter and steering lock and enables, after the ignition is switched off and without removing the key from the steering and starter lock, certain electrical components to be switched on, including for example, the radio, the courtesy light, etc. This function is deactivated on removing the key from the steering and starter lock.
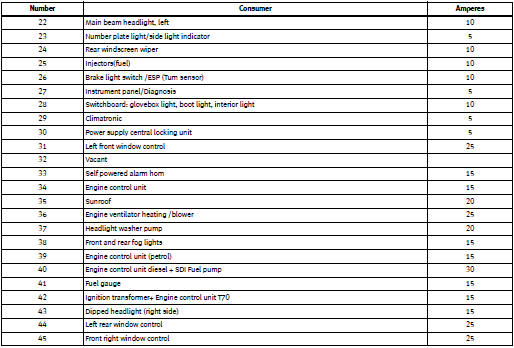
Fuses below steering wheel in relay holder
PTC fuses

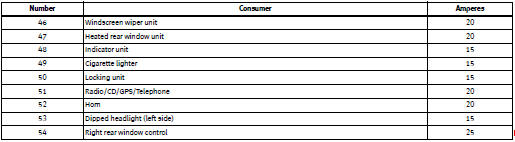
Fuses in engine compartment above battery
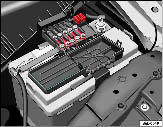
Fig. 147 Fuse box above battery
Metal fuses

Non-metal fuses

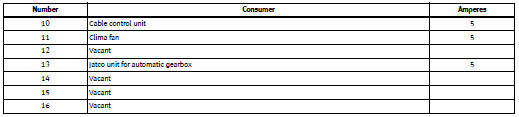
Some of the electrical items listed in the table are only fitted on certain models or are optional extras. Please note that the above list, while correct at the time of printing, is subject to alterations.


Other info:
Citroen C3. Identification markings
Various visible markings for the identifi -
cation of your vehicle.
A. Vehicle identifi cation number (VIN)
under the bonnet.
This number is engraved on the bodywork
near the damper mounting.
...
Peugeot 208. Alarm
System which protects and provides a deterrent against theft and break-ins. It
provides the following types of monitoring:
- Exterior perimeter
The system checks for opening of the vehicle. The ...
Renault Clio. Deadlocking
If the vehicle is equipped with a deadlocking
function, this allows you to lock
the opening elements and to prevent
the doors from being unlocked using
the interior handles (for example, by
b ...
Manuals For Car Models
-
 Chevrolet Sonic
 -
 Citroen C3
 -
 Fiat Punto
 -
 Honda Fit
 -
 Mazda 2
 -
 Nissan Micra
 -
 Peugeot 208
 -
 Renault Clio
 -
 Seat Ibiza
 -
 Skoda Fabia
 - Honda Pilot
- Volkswagen ID4
- Toyota Prius