
Skoda Fabia: Fabia Scout, Fabia RS foglights
Skoda Fabia Owners Manual
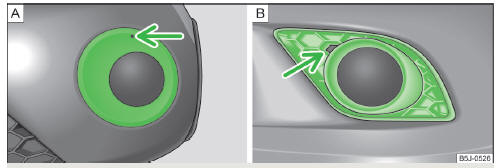
Fig. 159 Front bumper: Fabia Scout/Fabia RS
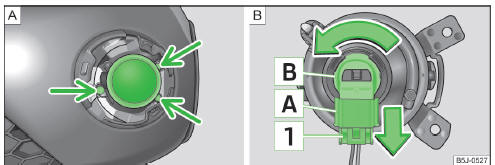
Fig. 160 Front bumper: Fog lights/fog lights: Replacing the light bulb
Removing the cap and fog light
- Insert the tool into the opening above the fog light » Fig. 159 - A (Fabia Scout) » page 158, Vehicle tool kit and remove the cover.
- Insert a finger into the opening next to the foglight » Fig. 159 - B (Fabia RS) and remove the cap.
- AUnscrew » page 158, Vehicle tool kitthe screws » Fig. 160 - with the screwdriver .
- Remove the fog lamp.
Changing light bulbs and installing fog lights
- Press the locking tab 1 » Fig. 160 on the connector A and remove the connector from the bulb holder B .
- Turn the bulb holder B and bulb in the direction of the arrow to the stop and remove.
- Replace the bulb, insert the bulb holder and new bulb and turn in the opposite direction to that of the arrow to the stop.
- Insert the plug A into the socket B .
- Retighten the screws and insert the cap. The cap must engage firmly.
Changing the licence plate light bulb
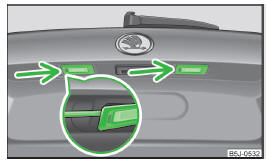
Fig. 161 Boot lid: Licence plate light
- Insert a flat screwdriver into the opening in the area of the arrow » Fig. 161 and carefully press towards the centre of the lamp; the lamp pops out slightly as you do this.
- Remove the lamp.
- Remove the faulty bulb from the holder and insert a new one.
- Replace the glass cover and push in until the stop.
Make sure that you install the glass cover in the correct position.


Other info:
Chevrolet Sonic. Taillamps, Turn Signal, Stoplamps, and Back-Up Lamps
Sedan Taillamp Shown, Hatchback Taillamp Similar
1. Back-up Lamp
2. Turn Signal Lamp
3. Stop Lamp/Taillamp
4. Sidemarker Lamp
To replace one of these bulbs:
1. Open the trunk.
2. Remove the ...
Skoda Fabia. Visibility
Rear window heating
Fig. 48 Button for rear window heater
The rear window heater is switched on or off by pressing the
button
» Fig. 48, the warning light in the switch comes on or g ...
Peugeot 208. Automatic lighting functions
Various automatic lighting functions are also available depending on options:
- guide-me-home lighting,
- cornering lighting,
- welcome lighting,
- daytime running lamps,
- automatic illumination ...
Manuals For Car Models
-
 Chevrolet Sonic
 -
 Citroen C3
 -
 Fiat Punto
 -
 Honda Fit
 -
 Mazda 2
 -
 Nissan Micra
 -
 Peugeot 208
 -
 Renault Clio
 -
 Seat Ibiza
 -
 Skoda Fabia
 - Honda Pilot
- Volkswagen ID4
- Toyota Prius