
Seat Ibiza: Wheel change
Seat Ibiza Owners Manual
Preparation work
What you must do before changing a wheel. – If you have a flat tyre or puncture, park the vehicle as far away from the flow of traffic as possible. Choose a location that is as level as possible. – All passengers should leave the vehicle. They should wait in a safe area (for instance behind the roadside crash barrier). – Switch off the engine. Switch on the hazard warning lights. – Apply the handbrake firmly. – Engage the first gear, or put the selector lever to position P for those vehicles with an automatic gearbox. – If you are towing a trailer, unhitch it from your vehicle. – Take the vehicle tools and the spare wheel out of the luggage compartment.
WARNING
Put the hazard warning lights on and place the warning triangle in position. This is for your own safety and also warns other road users.

Caution
If you have to change the tyre on a gradient, block the wheel opposite the wheel being changed by placing a stone or similar object under it to prevent the vehicle from rolling away.

Note
Please observe legal requirements when doing so.
Changing a wheel
Change the wheel as described below
– Pull off the hub cap see also. – Slacken the wheel bolts. – Raise the car with the jack in the corresponding zone. – Take off the wheel and then put on the spare wheel. – Lower the vehicle. – Tighten the wheel bolts firmly in diagonal sequence with the box spanner. – Replace the hub cap.
After changing a wheel
After changing the wheel there are still tasks to complete. – Put the tools and jack back in the luggage compartment. – Place the wheel with the defective tyre in the luggage compartment and secure it. – Check the tyre pressure of the newly fitted tyre as soon as possible. – Have the tightening torque of the wheel bolts checked as soon as possible with a torque wrench. The prescribed torque is 120 Nm.

Note
• If you notice that the wheel bolts are corroded and difficult to turn when changing a wheel, they must be replaced before having the wheel bolt torque checked.
• In the interest of safety, drive at moderate speeds until the wheel bolt torque has been checked.
Wheel trims
The wheel trims must be removed to gain access to the wheel bolts.
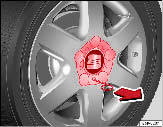
Fig. 139 Changing the wheel: Removing a hub cap
Dismantle
– Insert the extraction hook from the tools in the corresponding hole ⇒ fig. 139. – Pull off the hub cap.
Wheel covers
The wheel covers must be removed for access to the wheel bolts
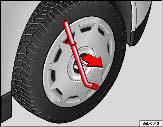
Fig. 140 Remove the complete hub cap
Dismantle
– Remove the wheel cover using the wire hook ⇒ fig. 140. – Hook this into one of the cut-outs of the wheel cover.
Fit
– Fit the wheel cover onto the wheel rim by pressing it firmly. Put pressure initially on the point of the cut-out for the valve. Next fit the rest of the hubcap.
Loosening the wheel bolts
The wheel bolts must be loosened before raising the vehicle.
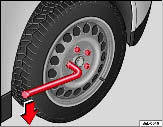
Fig. 141 Changing the wheel: loosen the wheel bolts
Loosening
– Fit the box spanner as far as it will go over the wheel bolt. – Grasp the box spanner by the end turn it about one full turn to the left ⇒ fig. 141.
Tightening
– Fit the box spanner as far as it will go over the wheel bolt. – Grasp the box spanner close to the end and turn the bolt to the right until it is secured. – An adapter is required to unscrew or tighten the anti-theft wheel bolts.
WARNING
Loosen the wheel bolts only about one turn before raising the vehicle with the jack, loosening the wheel bolts more than one turn can result in an accident.

Note
• Do not use the hexagonal socket in the screwdriver handle to loosen or tighten the wheel bolts.
• If the wheel bolt is very tight, you may be able to loosen it by pushing down the end of the spanner carefully with your foot. Hold on to the vehicle for support and take care not to slip.
Raising the vehicle
The vehicle must be raised with a jack to remove the wheel.
Fig. 142 The jacking points
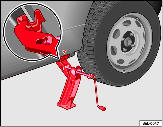
Fig. 143 Fitting the jack
– Locate the jacking point under the door sill closest to the wheel to be changed ⇒ fig. 142. – Wind up the jack under the jacking point until the arm of the jack is directly below the vertical rib under the door sill. – Align the jack so that the arm of the jack fits around the rib under the door sill and the movable base plate of the jack is flat on the ground ⇒ fig. 143. – Raise the vehicle until the defective wheel is just clear of the ground. Recesses at the front and rear of the door sills mark the jacking points ⇒ fig. 142. A position has been made for each wheel. Do not fit the jack anywhere else. An unstable surface under the jack may cause the vehicle to slip off the jack. Therefore, the jack must be fitted on solid ground offering good support. Use a large and stable base, if necessary. On a hard, slippery surface (such as tiles) use a rubber mat or similar to prevent the jack from slipping.
WARNING
• Take all precautions so that the base of the jack does not slip. Failure to do so could result in an accident.
• The vehicle can be damaged if the jack is not applied at the correct jacking points. There is also a risk of injury since the jack can slip off suddenly if it is not properly engaged.
Removing and fitting the wheel
For removal and fitting the wheel, the following tasks must be completed.
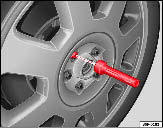
Fig. 144 Changing the wheel: hexagonal socket in screwdriver handle to turn the wheel bolts after they have been loosened
Change the wheel as described below after loosening the wheel bolts and raising the vehicle with the jack.
Removing a wheel
– Unscrew the bolts using the hexagonal tool in the handle of the screwdriver (vehicle tool) and place them on a clean surface ⇒ fig. 144.
Fitting a wheel
– Screw in the wheel bolts and tighten them lightly using the hexagonal socket in the screwdriver handle.
The wheel bolts should be clean and turn easily. Before fitting the spare wheel, inspect the condition of the wheel and hub mounting surfaces. These surfaces must be clean before fitting the wheel. The hexagonal socket in the screwdriver handle makes it easier to turn the wheel bolts when they are loose. The reversible screwdriver blade should be removed when the tool is used for this purpose. If tyres with a specific direction of rotation are fitted, note the direction of rotation.

Note
Do not use the hexagonal socket in the screwdriver handle to loosen or tighten the wheel bolts.
Anti-theft wheel bolts
A special adapter is required to turn the anti-theft wheel bolts.
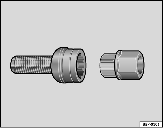
Fig. 145 Anti-theft wheel bolt
– Insert the adapter onto the wheel bolt and push it on as far as it will go, fig. 145. – Fit the box spanner as far as it will go over the adapter. – Loosen or tighten the wheel bolt as appropriate.
Error code
The code number of the anti-theft wheel bolt is stamped on the front of the adaptor. The code number should be noted and kept in a safe place, as it is only by using the code number that a duplicate adaptor can be obtained from an Authorised Service Centre.
Tyres with directional tread pattern
Tyres with directional tread pattern must be fitted so that they rotate in the correct direction. A directional tread pattern can be identified by arrows on the sidewall that point in the direction of rotation. Always note the direction of rotation indicated when fitting the wheel. This is important so that these tyres can give maximum grip and avoid excessive noise, tread wear and aquaplaning. If, in an emergency, you have to fit the spare wheel so it rotates in the wrong direction, you must drive extremely carefully. The tyre will not give optimum performance. This is particularly important when driving on wet roads. To benefit from the advantages of tyres with this type of tread pattern, the defective tyre should be replaced as soon as possible so that all tyres again rotate in the correct direction.


Other info:
Citroen C3. Electric child lock
Remote control system to prevent opening
of the rear doors using their interior
controls and use of the rear electric windows
* .
The control is located:
- either on the dashboard, driver’s ...
Nissan Micra. Trip computer
When the ignition switch is placed in the ON
position, modes of the trip computer can be
selected by pushing the trip computer
change/reset button A on the instrument panel
located near the speedo ...
Peugeot 208. Automatic illumination of headlamps
The sidelamps and dipped beam headlamps are switched on automatically, without
any action on the part of the driver, when a low level of external light is detected
or in certain cases of activatio ...
Manuals For Car Models
-
 Chevrolet Sonic
 -
 Citroen C3
 -
 Fiat Punto
 -
 Honda Fit
 -
 Mazda 2
 -
 Nissan Micra
 -
 Peugeot 208
 -
 Renault Clio
 -
 Seat Ibiza
 -
 Skoda Fabia
 - Honda Pilot
- Volkswagen ID4
- Toyota Prius